In this section, we’ll try to understand the process a typical Elm app goes through to retrieve data from an HTTP server. We’ll first create a simple HTTP server on our local computer. After that, we’ll build an Elm app that will fetch data from that server.
Creating a Local HTTP Server
There are many different ways to create an HTTP server on our local computer. We’ll use the NPM package called http-server, which allows us to serve static files. Static files are files that are served to the user exactly as they are stored, without any changes due to the user’s input or preferences. Go ahead and install it globally using the -g option so that it can be run from anywhere in the terminal.
$ npm install http-server -gNow create a file called old-school.txt inside a new directory called server, which should be placed in the beginning-elm root project directory.
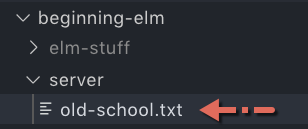
Add the following text to the old-school.txt file.

We are ready to start an HTTP server. Run the following command from the beginning-elm directory in terminal.
$ http-server server -a localhost -p 5016You should see an output like this:
Starting up http-server, serving server
Available on:
  http://localhost:5016
Hit CTRL-C to stop the server
The http-server command creates, you guessed it, an HTTP server. We give it the name of the directory to serve files from. In our case it’s server. The -a localhost option makes the URL look nicer. Without it, we would have to specify the IP address of the computer we are coding on like this: http://127.0.0.1:5016. The -p 5016 runs the server on
port 5016.
By default, an HTTP server runs on port 8080. Your computer might be running some other application that already uses that port, so it’s better to run our server on a different port to avoid a conflict. Port 5016 is rarely used by other applications.
If you go to the url http://localhost:5016/old-school.txt on a browser, you should see the contents of the old-school.txt file.

This means our local HTTP server is working. Next we’ll write some Elm code to communicate with this server.
Fetching Data from an HTTP Server
Elm provides a module called Http for sending and receiving data from a server. We installed this module in the Installing a Package section in chapter 2 by running the following command.
$ elm install elm/httpIf you don’t have it installed already, go ahead and run the above command from the beginning-elm directory in terminal. Don’t run it from the same terminal window where we ran http-server earlier. Create a new one. When elm install asks for your permission, answer y.
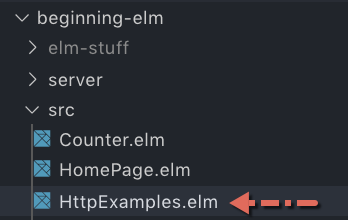
Here is our strategy: we will first write a simple Elm program to retrieve the contents of the old-school.txt file. We will then parse this comma-separated string to extract the nicknames of the main characters from Old School — a cult classic — and display those nicknames on a page. Let’s start by creating a new file called HttpExamples.elm in the beginning-elm/src directory.
Model
As usual, the first thing we will define is our model. Add the following code to HttpExamples.elm.
module HttpExamples exposing (Model)


type alias Model =
    List String
The string from server looks like this: "The Godfather, The Tank, Beanie, Cheese". We will extract each nickname and store it in a list. That’s why our model’s type is List String.
View
Next we’ll display the nicknames. Add the following code to the bottom of HttpExamples.elm.
view : Model -> Html Msg
view model =
    div []
        [ button [ onClick SendHttpRequest ]
            [ text "Get data from server" ]
        , h3 [] [ text "Old School Main Characters" ]
        , ul [] (List.map viewNickname model)
        ]


viewNickname : String -> Html Msg
viewNickname nickname =
    li [] [ text nickname ]
Although our view is quite simple, let’s briefly go through each element. First, we display a button that when clicked tells the Elm runtime to dispatch SendHttpRequest message to the update function — we’ll implement SendHttpRequest and update in a moment. Then we add a heading followed by an unordered (bulleted) list of nicknames.
The code for rendering each nickname is extracted out to a separate function called viewNickname. It’s a common practice in Elm to render an individual item in a list using a separate function. List.map applies the viewNickname function to each nickname in our model to produce a list of li tags. All functions in view are defined in the Html and Html.Events modules. Let’s import those modules in HttpExamples.elm.
module HttpExamples exposing (Model)

import Html exposing (..)
import Html.Events exposing (onClick)
.
.
Update
Next up is the update function and message type. Add the following code to the bottom of HttpExamples.elm.
type Msg
    = SendHttpRequest
    | DataReceived (Result Http.Error String)


url : String
url =
    "http://localhost:5016/old-school.txt"


getNicknames : Cmd Msg
getNicknames =
    Http.get
        { url = url
        , expect = Http.expectString DataReceived
        }


update : Msg -> Model -> ( Model, Cmd Msg )
update msg model =
    case msg of
        SendHttpRequest ->
            ( model, getNicknames )
And import the Http module.
module HttpExamples exposing (Model)

import Http
.
.
update handles the SendHttpRequest message by returning the original model and a command for fetching nicknames from the local HTTP server we created earlier. Here is what the Http.get function’s type signature looks like:
get :
    { url : String
    , expect : Expect msg
    }
    -> Cmd msg
It takes a record with two fields and returns a command. The url field holds the location of the server resource. The expect field specifies the format we expect from the server. By using Http.expectString, we’re letting Elm know that we expect the response body to be a string. Here is what the Http.expectString function’s type signature looks like:
Comparing Http.get to Random.generate
In the Commands section, we wrote the following code to generate a random number.
update : Msg -> Model -> ( Model, Cmd Msg )
update msg model =
    case msg of
        GenerateRandomNumber ->
            ( model, Random.generate NewRandomNumber (Random.int 0 100) )
Although Random.generate and Http.get look structurally different, they both contain three ingredients required for communicating with the outside world:
- A mechanism for creating a command.
- What needs to happen when the command is run?
- Which message should be sent to the app after the command has been executed?
Comparing DataReceived to NewRandomNumber
The DataReceived message looks slightly more complex than NewRandomNumber.
-- HttpExamples.elm --

type Msg
    = SendHttpRequest
    | DataReceived (Result Http.Error String)
-- RandomNumber.elm --
type Msg
= GenerateRandomNumber
| NewRandomNumber IntThe command for generating a random number always succeeds. We are guaranteed to receive a random number from the Elm runtime when asked. That’s why NewRandomNumber’s definition is so simple. In contrast, fetching data from a server can fail. Perhaps the server isn’t available or the URL we’re trying to reach is incorrect. There are many other reasons why fetching data from a server may fail. Therefore, unlike Random.generate, Http.get must account for those failure scenarios.
As mentioned in the Type System section, Elm has a built-in type called Result for representing the outcome of an operation that can fail.
type Result error value
    = Ok value
    | Err error
It accepts two arguments: error and value. In our case, the type of error is Http.Error and the type of value is String.
DataReceived (Result Http.Error String)Http.Error is a built-in custom type with the following data constructors.
type Error
    = BadUrl String
    | Timeout
    | NetworkError
    | BadStatus Int
    | BadBody String
Whenever an HTTP request fails, we can expect to receive one of these values as DataReceived’s payload. If the request is successful, DataReceived’s payload will be a string. Check out the official documentation to find out what those error types mean.
Handling DataReceived Message
We need to tell the update function what to do when the DataReceived message arrives. Add a new case branch to update in HttpExamples.elm to handle that message as shown below.
update : Msg -> Model -> ( Model, Cmd Msg )
update msg model =
    case msg of
        SendHttpRequest ->
            ( model, getNicknames )

        DataReceived result ->
            case result of
                Ok nicknamesStr ->
                    let
                        nicknames =
                            String.split "," nicknamesStr
                    in
                    ( nicknames, Cmd.none )

                Err httpError ->
                    ( model, Cmd.none )
All we are doing here is unpacking the result payload that rides on DataReceived’s back. If it’s a successful response, the individual nicknames are extracted from a string into a list using String.split and that list is returned as an updated model. If the response is an error, we simply return the existing model. We’ll write proper error handling code in the Handling HTTP Errors section below.
Notice how we have managed to cram a case expression inside another case expression in the update function? We can use pattern matching to get rid of nested case expressions like this:
update : Msg -> Model -> ( Model, Cmd Msg )
update msg model =
    case msg of
        SendHttpRequest ->
            ( model, getNicknames )

        DataReceived (Ok nicknamesStr) ->
            let
                nicknames =
                    String.split "," nicknamesStr
            in
            ( nicknames, Cmd.none )

        DataReceived (Err _) ->
            ( model, Cmd.none )
In Elm, tuples can be used to write concise yet clear case expressions by matching complex patterns as we have done in the above refactoring. We’ve also replaced the payload httpError with _ because we aren’t using it right now. It’s best practice to replace all unused parameters with _ in Elm.
We’ve assembled all pieces required to fire an HTTP command. The following diagram shows how various components in our app interact with the Elm runtime to accomplish the task of fetching nicknames from a server.
Wiring Everything Up
Even after writing all that code, we still don’t have a working app. Let’s wire everything up by adding the main function to the bottom of HttpExamples.elm.
main : Program () Model Msg
main =
    Browser.element
        { init = \flags -> ( [], Cmd.none )
        , view = view
        , update = update
        , subscriptions = \_ -> Sub.none
        }
We also need to import the Browser module in HttpExamples.elm.
module HttpExamples exposing (main)

import Browser
.
.
Instead of creating a separate init function, we directly assigned an anonymous function that takes flags and returns a tuple containing an empty list of nicknames and commands to the init field in main. It doesn’t make sense to create a separate function if all it’s going to do is return empty values, even though we did exactly that in the Commands section.
Finally, we’re ready to taste the fruits of our labor. Fire up elm reactor from the beginning-elm directory in terminal if it’s not running already, and go to this URL in your browser: http://localhost:8000/src/HttpExamples.elm. You should see a view that looks like this:
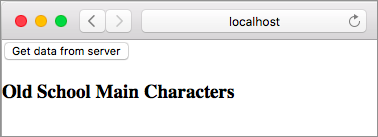
Unfortunately, if you click the Get data from server button right now nothing happens. What could have gone wrong? To find out open the browser console. You should see an error message that looks like this:

What the browser is trying to tell us is that we can’t request data from a domain that’s different from the one where the request was originated from. For security reasons, most modern browsers restrict cross-origin HTTP requests initiated through an ajax call which uses the XMLHttpRequest JavaScript object behind the scenes. The Elm runtime uses ajax to send all HTTP requests under the hood. That’s why we weren’t able to fetch the nicknames.
At this point you may be wondering why we received that error when the local server domain and the client app domain are exactly the same: localhost. As it turns out, the cross-origin policy dictates that it’s not enough for the domains to be the same. The ports also have to match, but our server and client app are running on different ports.
- Server URL:
http://localhost:5016/old-school.txt - Client URL:
http://localhost:8000/src/HttpExamples.elm
Allowing Cross-Origin Resource Sharing
How do we fix this cross-origin issue? A solution is lurking in the error message. If you look closely, the browser is telling us what it expects: No 'Access-Control-Allow-Origin' header is present on the requested resource.
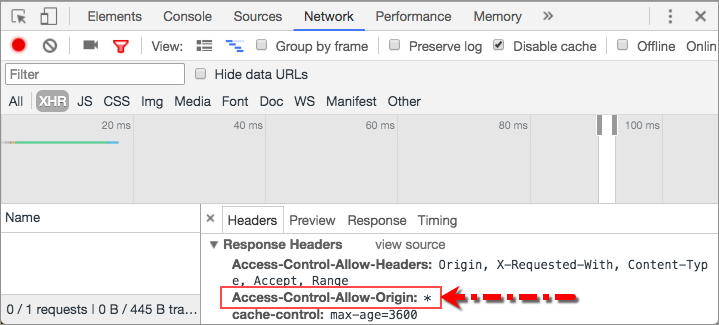
Access-Control-Allow-Origin is one of the headers included in a response sent by the server. It indicates which domains are allowed to use the response. For example, if the server returns Access-Control-Allow-Origin: *, the response can be used by any domain. But if the server wants only certain domains to have access then it’ll return a domain name(s) instead of *. Here’s an example: Access-Control-Allow-Origin: http://localhost:8000.
The http-server package we used earlier to create a local server provides an option called --cors for enabling Cross-Origin Resource Sharing (CORS) via the Access-Control-Allow-Origin header. Let’s stop our local server by pressing Ctrl + c and then restart it using the --cors option.
$ http-server server -a localhost -p 5016 --corsNow open a new browser window in private mode and go to http://localhost:8000/src/HttpExamples.elm. After that click the Get data from server button and you should see the nicknames of some of the most popular characters in American fraternity culture.
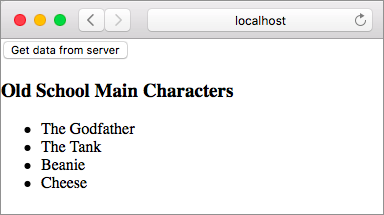
Note: Most browsers cache CORS policies for sometime in non-private mode. That’s wny we need to open HttpExamples.elm in private mode. Otherwise, we keep getting the same CORS error we saw earlier even after refreshing the page.
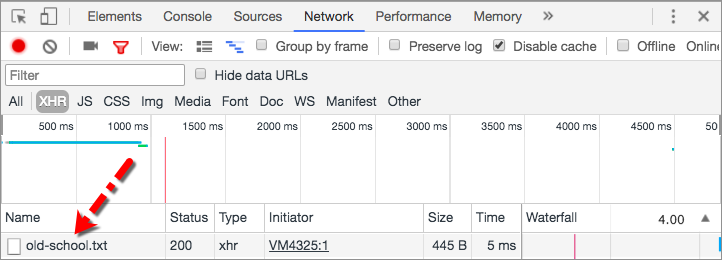
The --cors option adds Access-Control-Allow-Origin: * to the list of response headers. If you are using the Chrome browser, you can verify the presence of that header by following these steps:
Step 1. Open the page located at http://localhost:8000/src/HttpExamples.elm in a new private window.
Step 2. Go to the Network tab in Developer Tools window.
Step 3. Click the Get data from server button from our app.
Step 4. A new row should appear in the Network tab. Click old-school.text below the Name column.
Step 5. Look for Access-Control-Allow-Origin in the Response Headers section.
Handling HTTP Errors
Earlier in this section, we cheated by simply returning an existing model when a request to fetch nicknames failed.
update : Msg -> Model -> ( Model, Cmd Msg )
update msg model =
    case msg of
        .
        .
        DataReceived (Err _) ->
            ( model, Cmd.none )
We’ll rectify that by showing a proper error message.
Storing an Error Message
The first thing we need to do is store an error message in our model. Right now it’s just a list of strings.
type alias Model =
    List String
We could simply append the error message to this list, but that seems a bit hacky. A better alternative is to store it separately from nicknames. Let’s change our Model to use a record instead.
type alias Model =
    { nicknames : List String
    , errorMessage : Maybe String
    }
The errorMessage field’s type is Maybe String instead of just String. That’s because if the HTTP request is successful, there won’t be any error to show. What we need is a data structure that can represent the absence of a value. Maybe fits the bill.
Fixing Compiler Errors
Changing the structure of our Model causes the Elm compiler to throw errors when we refresh the page at http://localhost:8000/src/HttpExamples.elm. We can actually use those errors as a guide to figure out what needs to be fixed. This is a big advantage Elm has over other languages that don’t have a robust type system. We can count on the Elm compiler to catch our mistakes — no matter how subtle — as we mercilessly refactor our code.
Let’s start with the view function. Nicknames are now located inside a record, so we need to use the dot syntax to access them. Modify the line that contains the ul tag in view to this:
view : Model -> Html Msg
view model =
    div []
        .
        .
        , ul [] (List.map viewNickname model.nicknames)
        ]
Next we’ll fix the update function. Right now it splits the nicknames string into a list and returns that as a model. We can’t do that anymore. We need to assign the list to the nicknames property inside the model. Modify the DataReceived (Ok nicknamesStr) branch in update to this:
DataReceived (Ok nicknamesStr) ->
    let
        nicknames =
            String.split "," nicknamesStr
    in
        ( { model | nicknames = nicknames }, Cmd.none )
The only thing remaining to fix is the value we’re assigning to the init property in main. Change it to the following.
main : Program () Model Msg
main =
    Browser.element
        { init = \flags -> ( { nicknames = [], errorMessage = Nothing }, Cmd.none )
        .
        .
Inlining an initial model like that makes our code look a bit clunky. Let’s extract it out to a separate function.
init : () -> ( Model, Cmd Msg )
init _ =
    ( { nicknames = []
      , errorMessage = Nothing
      }
    , Cmd.none
    )


main : Program () Model Msg
main =
    Browser.element
        { init = init
        .
        .
And we’re back to having a working app. Open the page at http://localhost:8000/src/HttpExamples.elm in a new private window and click the Get data from server button to make sure that you can successfully fetch the nicknames.
Displaying an Error Message
Here is our plan for notifying the users when things go haywire: if the request to fetch nicknames succeeds, we’ll display a heading and a bulleted list of nicknames. However, if the request fails, we’ll replace the heading and nicknames with an error message. We can accomplish that by modifying our view code in HttpExamples.elm as shown below.
view : Model -> Html Msg
view model =
    div []
        [ button [ onClick SendHttpRequest ]
            [ text "Get data from server" ]
        , viewNicknamesOrError model
        ]


viewNicknamesOrError : Model -> Html Msg
viewNicknamesOrError model =
    case model.errorMessage of
        Just message ->
            viewError message

        Nothing ->
            viewNicknames model.nicknames


viewError : String -> Html Msg
viewError errorMessage =
    let
        errorHeading =
            "Couldn't fetch nicknames at this time."
    in
        div []
            [ h3 [] [ text errorHeading ]
            , text ("Error: " ++ errorMessage)
            ]


viewNicknames : List String -> Html Msg
viewNicknames nicknames =
    div []
        [ h3 [] [ text "Old School Main Characters" ]
        , ul [] (List.map viewNickname nicknames)
        ]


viewNickname : String -> Html Msg
viewNickname nickname =
    li [] [ text nickname ]
We’re using separate functions to render an error message and nicknames. The core logic for rendering nicknames hasn’t changed at all. We just extracted that logic out to the viewNicknames function. The viewError function accepts an error message which will be determined later when we deal with the Http.Error value. We render that error message right below a heading.
Creating an Error Message
When a request to fetch nicknames fails, the update function is notified with a value of type Http.Error which lays out all the different ways a request can fail.
type Error
    = BadUrl String
    | Timeout
    | NetworkError
    | BadStatus Int
    | BadBody String
Add a function called buildErrorMessage right below update in HttpExamples.elm. This new function determines what the error message should be in each failure case.
buildErrorMessage : Http.Error -> String
buildErrorMessage httpError =
    case httpError of
        Http.BadUrl message ->
            message

        Http.Timeout ->
            "Server is taking too long to respond. Please try again later."

        Http.NetworkError ->
            "Unable to reach server."

        Http.BadStatus statusCode ->
            "Request failed with status code: " ++ String.fromInt statusCode

        Http.BadBody message ->
            message
If a data constructor has a payload, an error message is created based on what’s inside it. Otherwise, we just hard code it. Now call buildErrorMessage from update to set the errorMessage property inside our model as shown below.
update : Msg -> Model -> ( Model, Cmd Msg )
update msg model =
    case msg of
        .
        .
        DataReceived (Err httpError) ->
            ( { model
                | errorMessage = Just (buildErrorMessage httpError)
              }
            , Cmd.none
            )
We replaced _ with httpError in the DataReceived (Err httpError) -> branch because we’re now actually using the error payload. We also wrapped the return value from buildErrorMessage in Just because the errorMessage property expects a Maybe type. We’re ready to test the error handling code. Let’s change the URL to something invalid in HttpExamples.elm.
url : String
url =
    "http://localhost:5016/invalid.txt"
If you refresh the page at http://localhost:8000/src/HttpExamples.elm and click the Get data from server button, you should see the following error message.
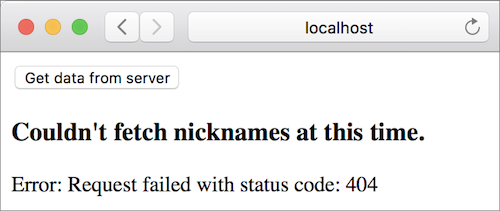
Change the URL back to http://localhost:5016/old-school.txt. We won’t test other error types here, but if you ever receive one you now know how to handle it.
url : String
url =
    "http://localhost:5016/old-school.txt"
Summary
We need to go through three steps to retrieve data from a server:
1. Specify where to retrieve data from. We used the url and expect fields in the record passed to the Http.get function to let the Elm runtime know where our data resides and in what format.
2. Retrieve data. Sending and receiving data from a server causes side effects. Since Elm functions aren’t allowed to have any side effects, our application code can’t retrieve data by itself. It needs to ask the Elm runtime to do that by sending a command. We used the Http.get function to wrap our request in a command and handed that over to the runtime. The runtime executed that command to retrieve data from our local server.
3. Notify the update function. If the request is successful, the runtime sends the DataReceived message to update with retrieved data as a payload. If the request fails, the payload is an error.
The sequence diagram below shows how the interaction between the Elm runtime and our code looks while fetching data. Notice how similar the interaction is to the process of generating random numbers shown in the Commands section.
In the next section, we will explore how to retrieve and decode JSON data from a server. Here is the entire code from HttpExamples.elm:
module HttpExamples exposing (main)

import Browser
import Html exposing (..)
import Html.Events exposing (onClick)
import Http


type alias Model =
    { nicknames : List String
    , errorMessage : Maybe String
    }


view : Model -> Html Msg
view model =
    div []
        [ button [ onClick SendHttpRequest ]
            [ text "Get data from server" ]
        , viewNicknamesOrError model
        ]


viewNicknamesOrError : Model -> Html Msg
viewNicknamesOrError model =
    case model.errorMessage of
        Just message ->
            viewError message

        Nothing ->
            viewNicknames model.nicknames


viewError : String -> Html Msg
viewError errorMessage =
    let
        errorHeading =
            "Couldn't fetch nicknames at this time."
    in
    div []
        [ h3 [] [ text errorHeading ]
        , text ("Error: " ++ errorMessage)
        ]


viewNicknames : List String -> Html Msg
viewNicknames nicknames =
    div []
        [ h3 [] [ text "Old School Main Characters" ]
        , ul [] (List.map viewNickname nicknames)
        ]


viewNickname : String -> Html Msg
viewNickname nickname =
    li [] [ text nickname ]


type Msg
    = SendHttpRequest
    | DataReceived (Result Http.Error String)


url : String
url =
    "http://localhost:5016/old-school.txt"


getNicknames : Cmd Msg
getNicknames =
    Http.get
        { url = url
        , expect = Http.expectString DataReceived
        }


update : Msg -> Model -> ( Model, Cmd Msg )
update msg model =
    case msg of
        SendHttpRequest ->
            ( model, getNicknames )

        DataReceived (Ok nicknamesStr) ->
            let
                nicknames =
                    String.split "," nicknamesStr
            in
            ( { model | nicknames = nicknames }, Cmd.none )

        DataReceived (Err httpError) ->
            ( { model
                | errorMessage = Just (buildErrorMessage httpError)
              }
            , Cmd.none
            )


buildErrorMessage : Http.Error -> String
buildErrorMessage httpError =
    case httpError of
        Http.BadUrl message ->
            message

        Http.Timeout ->
            "Server is taking too long to respond. Please try again later."

        Http.NetworkError ->
            "Unable to reach server."

        Http.BadStatus statusCode ->
            "Request failed with status code: " ++ String.fromInt statusCode

        Http.BadBody message ->
            message


init : () -> ( Model, Cmd Msg )
init _ =
    ( { nicknames = []
      , errorMessage = Nothing
      }
    , Cmd.none
    )


main : Program () Model Msg
main =
    Browser.element
        { init = init
        , view = view
        , update = update
        , subscriptions = \_ -> Sub.none
        }


