The only operation left to cover is creating a new post. In this section, we’ll build a new page designed specifically for that purpose.
Adding Create New Post Link
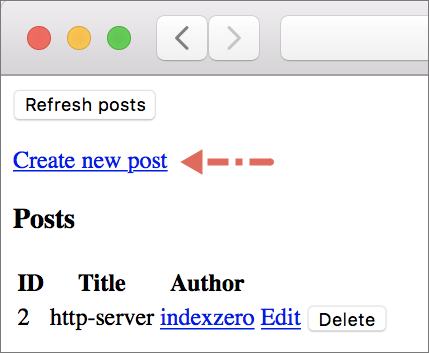
Here’s the plan: we’ll add a link that says Create new post below the Refresh posts button on the ListPosts page. When that link is clicked, we’ll take the user to a new page which will contain a form for creating a new post. Modify the view function in ListPosts.elm as shown below.
view : Model -> Html Msg
view model =
    div []
        [ button [ onClick FetchPosts ]
            [ text "Refresh posts" ]
        , br [] []
        , br [] []
        , a [ href "/posts/new" ]
            [ text "Create new post" ]
        , viewPosts model.posts
        , viewDeleteError model.deleteError
        ]
Run json-server and elm-live from the beginning-elm directory in separate terminal windows if they aren’t running already.
$ json-server --watch server/db.json -p 5019

$ elm-live post-app/Main.elm --pushstate
Now go to http://localhost:8000 and you should see the link for creating a new post.
The following sequence diagram shows all the steps our app goes through when the Create new post link is clicked. It looks very similar to the sequence diagram for an edit post link. We’ll use the following diagram as a guide for implementing the NewPost page.

Step 8: Extracting NewPost Route from URL
Steps 1 through 7 shown in the diagram above are already in place. Let’s implement step 8 by adding a new data constructor called NewPost to the Route type in Route.elm.
type Route
    .
    .
    | Post PostId
    | NewPost
NewPost page’s path is quite simple as shown in the figure below.

Let’s add a parser to matchRoute in Route.elm for matching the new post path.
matchRoute : Parser (Route -> a) a
matchRoute =
    oneOf
        .
        .
        , map Post (s "posts" </> Post.idParser)
        , map NewPost (s "posts" </> s "new")
        ]
The table below shows which parser in matchRoute is responsible for matching which path in a given URL.
| URL | Path | Parser | Route |
|---|---|---|---|
http://localhost:8000 |
top |
Posts |
|
http://localhost:8000/posts |
/posts |
s "posts" |
Posts |
http://localhost:8000/posts/1 |
/posts/1 |
s "posts" </> Post.idParser |
Post PostId |
http://localhost:8000/posts/new |
/posts/new |
s "posts" </> s "new" |
NewPost |
Step 10: Identify NewPost as the Next Page
Step 9 from the sequence diagram above tells us to store NewPost in the route field in main model. We’ve already done that in the Main.update function.
update : Msg -> Model -> ( Model, Cmd Msg )
update msg model =
    case ( msg, model.page ) of
        .
        .
        ( UrlChanged url, _ ) ->
            let
                newRoute =
                    Route.parseUrl url
            in
            ( { model | route = newRoute }, Cmd.none )
                |> initCurrentPage
        .
        .
And step 10 tells us to identify NewPost as the next page. We haven’t done that yet. Let’s add a new branch to initCurrentPage in Main.elm for the NewPost route.
initCurrentPage : ( Model, Cmd Msg ) -> ( Model, Cmd Msg )
initCurrentPage ( model, existingCmds ) =
    let
        ( currentPage, mappedPageCmds ) =
            case model.route of
                .
                .
                Route.Post postId ->
                    ...

                Route.NewPost ->
                    let
                        ( pageModel, pageCmd ) =
                            NewPost.init model.navKey
                    in
                    ( NewPage pageModel, Cmd.map NewPageMsg pageCmd )
    in
    ...
Now add NewPage to the Page type in Main.elm.
type Page
    .
    .
    | EditPage EditPost.Model
    | NewPage NewPost.Model
Creating the NewPost Page
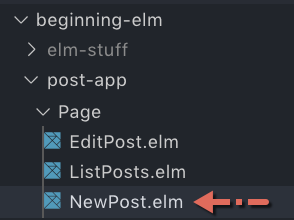
To fully implement step 10 we also need to create the NewPost page module. Create a new file called NewPost.elm inside the Page directory and add the following code to it.
module Page.NewPost exposing (Model)


type alias Model =
    {}
Like EditPost, the NewPost page module’s central type is also Model which is an empty record right now. We’ll expand it as we keep building the page.
The branch for the NewPost route in Main.update shows that the function for initializing the NewPost page takes a navigation key as the only input.
( pageModel, pageCmd ) =
    NewPost.init model.navKey
Let’s implement that function by adding the following code to the bottom of NewPost.elm.
init : Nav.Key -> ( Model, Cmd Msg )
init navKey =
    ( initialModel navKey, Cmd.none )


initialModel : Nav.Key -> Model
initialModel navKey =
    { navKey = navKey
    }
We need access to navKey in NewPost to navigate users to the ListPosts page after a new post has been created. Let’s add that field to the model in NewPost.elm.
type alias Model =
    { navKey : Nav.Key
    }
Key is defined in the Browser.Navigation module, so we need to import it in NewPost.elm.
module Page.NewPost exposing (Model)

import Browser.Navigation as Nav
.
.
Showing the New Post Form
We’re now ready to build a form through which the user will create a new post. Add the following code to the bottom of NewPost.elm.
view : Model -> Html Msg
view model =
    div []
        [ h3 [] [ text "Create New Post" ]
        , newPostForm
        ]


newPostForm : Html Msg
newPostForm =
    Html.form []
        [ div []
            [ text "Title"
            , br [] []
            , input [ type_ "text", onInput StoreTitle ] []
            ]
        , br [] []
        , div []
            [ text "Author Name"
            , br [] []
            , input [ type_ "text", onInput StoreAuthorName ] []
            ]
        , br [] []
        , div []
            [ text "Author URL"
            , br [] []
            , input [ type_ "text", onInput StoreAuthorUrl ] []
            ]
        , br [] []
        , div []
            [ button [ type_ "button", onClick CreatePost ]
                [ text "Submit" ]
            ]
        ]
We need to import the following modules in NewPost.elm.
module Page.NewPost exposing (Model)

import Html exposing (..)
import Html.Attributes exposing (..)
import Html.Events exposing (onClick, onInput)
.
.
onInput Messages
The input elements in newPostForm send separate messages to the Elm runtime whenever their content is modified. Let’s add those messages to a new type called Msg. The following code goes to the bottom of NewPost.elm.
type Msg
    = StoreTitle String
    | StoreAuthorName String
    | StoreAuthorUrl String
Now add update to the bottom of NewPost.elm for handling those messages.
update : Msg -> Model -> ( Model, Cmd Msg )
update msg model =
    case msg of
        StoreTitle title ->
            let
                oldPost =
                    model.post

                updateTitle =
                    { oldPost | title = title }
            in
            ( { model | post = updateTitle }, Cmd.none )

        StoreAuthorName name ->
            let
                oldPost =
                    model.post

                updateAuthorName =
                    { oldPost | authorName = name }
            in
            ( { model | post = updateAuthorName }, Cmd.none )

        StoreAuthorUrl url ->
            let
                oldPost =
                    model.post

                updateAuthorUrl =
                    { oldPost | authorUrl = url }
            in
            ( { model | post = updateAuthorUrl }, Cmd.none )
All three branches use the post field to store information. We haven’t added that field to the Model record in NewPost.elm yet. Let’s do that next.
type alias Model =
    { navKey : Nav.Key
    , post : Post
    }
For comparison, the post field in EditPost.elm had WebData as its type.
type alias Model =
    { navKey : Nav.Key
    , post : WebData Post
    , saveError : Maybe String
    }
The EditPost module needed to retrieve the post we wanted to edit from a server when the page was loading. By using WebData, we were able to track all states our fetch request went through.
In contrast, NewPost doesn’t retrieve a post when the page is loading. So how do we initialize the post field in NewPost.elm? We can do that by assigning it an empty post.
initialModel : Nav.Key -> Model
initialModel navKey =
    { navKey = navKey
    , post = emptyPost
    }
Add the following code to the bottom of Post.elm.
emptyPost : Post
emptyPost =
    { id = emptyPostId
    , title = ""
    , authorName = ""
    , authorUrl = ""
    }


emptyPostId : PostId
emptyPostId =
    PostId -1
We’re using -1 as an empty post’s id to indicate that it’s temporary. The real id will be assigned later when the server actually creates a post. It’s highly unlikely that a real post will have a negative number as its id. Most servers start with a positive number as an id and keep incrementing it whenever a new resource is created. We need to expose emptyPost in Post.elm and NewPost.elm.
module Post exposing
    .
    .
    , emptyPost
    )
module Page.NewPost exposing (Model)
import Post exposing (Post, PostId, emptyPost, postDecoder)
.
.Record Dot Syntax
Elm prohibits the use of dot syntax when updating a record field. That’s why we couldn’t use model.post inside updateTitle when handling the StoreTitle message like this:
 title ->
    let
        updateTitle =
            { model.post | title = title }
    in
    ( { model | post = updateTitle }, Cmd.none )
That forced us to create a separate constant for holding the old post like this:
StoreTitle title ->
    let
        oldPost =
            model.post

        updateTitle =
            { oldPost | title = title }
    in
    ( { model | post = updateTitle }, Cmd.none )
Creating a Post
To create a new post, the user has to click the Submit button. When that happens, the CreatePost message is sent to the Elm runtime.
newPostForm : Html Msg
newPostForm =
        .
        .
        , div []
            [ button [ type_ "button", onClick CreatePost ]
                [ text "Submit" ]
            ]
        ]
Let’s add that message to the Msg type in NewPost.elm.
type Msg
    .
    .
    | StoreAuthorUrl String
    | CreatePost
Now add a new branch to update in NewPost.elm for handling the CreatePost message.
update : Msg -> Model -> ( Model, Cmd Msg )
update msg model =
    case msg of
        .
        .
        StoreAuthorUrl url ->
            ...

        CreatePost ->
            ( model, createPost model.post )
The CreatePost -> branch asks the createPost function to build an HTTP request. Let’s implement that right below update in NewPost.elm.
createPost : Post -> Cmd Msg
createPost post =
    Http.post
        { url = "http://localhost:5019/posts"
        , body = Http.jsonBody (newPostEncoder post)
        , expect = Http.expectJson PostCreated postDecoder
        }
We need to import the Http module in NewPost.elm.
module Page.NewPost exposing (Model)

import Http
.
.
Http.post
Luckily, Elm does provide a function called Http.post for creating an HTTP POST request which is used for creating a new resource on the server. The name of this request has nothing to do with the name we picked for our resource — post. It’s just a coincidence. Here’s what Http.post’s type signature looks like:
post :
    { url : String
    , body : Body
    , expect : Expect msg
    }
    -> Cmd msg
For comparison, here’s what the type signature of Http.get we covered in the Fetching Data from an HTTP Server section looks like:
get :
    { url : String
    , expect : Expect msg
    }
    -> Cmd msg
The only difference is Http.post takes a body whereas Http.get doesn’t. Just like the PATCH request we created for saving a post, the POST request also uses the Http.jsonBody function to make it clear that the body of our request is in JSON format.
body = Http.jsonBody (newPostEncoder post)The PATCH request used the postEncoder function to encode Elm values to JSON. Here’s how it looks:
postEncoder : Post -> Encode.Value
postEncoder post =
    Encode.object
        [ ( "id", encodeId post.id )
        , ( "title", Encode.string post.title )
        , ( "authorName", Encode.string post.authorName )
        , ( "authorUrl", Encode.string post.authorUrl )
        ]


encodeId : PostId -> Encode.Value
encodeId (PostId id) =
    Encode.int id
createPost can’t use that encoder because our new post doesn’t have a real id yet. The server is responsible for creating that. The JSON body that eventually gets sent to the server for creating a new post will look something like this:
{
  "title": "new-title",
  "authorName": "new-author-name",
  "authorUrl": "https://new-author-url.com"
}
Notice the id field is missing. Whereas the JSON for updating an existing post looks something like this:
{
  "id": 2,
  "title": "http-server (modified)",
  "authorName": "indexzero",
  "authorUrl": "https://github.com/indexzero"
}
postEncoder includes id. That’s why we can’t use it in createPost. What we need is a separate encoder called newPostEncoder that only includes title, authorName, and authorUrl. Let’s add that below postEncoder in Post.elm.
newPostEncoder : Post -> Encode.Value
newPostEncoder post =
    Encode.object
        [ ( "title", Encode.string post.title )
        , ( "authorName", Encode.string post.authorName )
        , ( "authorUrl", Encode.string post.authorUrl )
        ]
We need to expose newPostEncoder in Post.elm and NewPost.elm.
module Post exposing
    .
    .
    , newPostEncoder
    )
module Page.NewPost exposing (Model)
import Post exposing (Post, PostId, emptyPost, newPostEncoder, postDecoder)
.
.PostCreated Message
When the POST request is complete, the Elm runtime will send the PostCreated message to update. Let’s add it to the Msg type in NewPost.elm.
type Msg
    .
    .
    | CreatePost
    | PostCreated (Result Http.Error Post)
Just like PostSaved, PostCreated’s payload also doesn’t need to be of type WebData. A simple Result type is sufficient. Let’s handle PostCreated by adding two new branches to update in NewPost.elm.
update : Msg -> Model -> ( Model, Cmd Msg )
update msg model =
    case msg of
        CreatePost ->
            ...

        PostCreated (Ok post) ->
            ( { model | post = post, createError = Nothing }
            , Cmd.none
            )

        PostCreated (Err error) ->
            ( { model | createError = Just (buildErrorMessage error) }
            , Cmd.none
            )
Handling Post Create Error
If the request is successful, we need to assign the newly created post to the post field. But if the request fails, we need to save an error message in the createError field. Let’s add that field to Model in NewPost.elm.
type alias Model =
    { navKey : Nav.Key
    , post : Post
    , createError : Maybe String
    }
Now initialize createError to Nothing in initialModel.
initialModel : Nav.Key -> Model
initialModel navKey =
    { navKey = navKey
    , post = emptyPost
    , createError = Nothing
    }
And import the Route and Error modules in NewPost.elm.
module Page.NewPost exposing (Model, Msg, init, update, view)

import Error exposing (buildErrorMessage)
import Route
.
.
Next we need to display the error message. Add the following code below the newPostForm function in NewPost.elm.
viewError : Maybe String -> Html msg
viewError maybeError =
    case maybeError of
        Just error ->
            div []
                [ h3 [] [ text "Couldn't create a post at this time." ]
                , text ("Error: " ++ error)
                ]

        Nothing ->
            text ""
And call viewError from view in NewPost.elm.
view : Model -> Html Msg
view model =
    div []
        [ h3 [] [ text "Create New Post" ]
        , newPostForm
        , viewError model.createError
        ]
Taking Users Back to the ListPosts Page
It makes sense to take the users back to the ListPosts page after a new post is created. To do that, we need to return a command from the PostCreated (Ok post) -> branch using Route.pushUrl. Modify that branch in NewPost.update as shown below.
update : Msg -> Model -> ( Model, Cmd Msg )
update msg model =
    case msg of
        .
        .
        PostCreated (Ok post) ->
            ( { model | post = post, createError = Nothing }
            , Route.pushUrl Route.Posts model.navKey
            )

        PostCreated (Err error) ->
            ...
We already implemented Route.pushUrl in the Creating Edit Post Page section, but we haven’t added a branch for the NewPost route in routeToString yet. Let’s do that in Route.elm.
routeToString : Route -> String
routeToString route =
    case route of
        .
        .
        Post postId ->
            ...

        NewPost ->
            "/posts/new"
Adding NewPageMsg to Main
Now that we’re done implementing the NewPost page, we need to import it in Main.elm.
module Main exposing (main)

import Page.NewPost as NewPost
.
.
Currently, the NewPost module exposes only Model. We need to expose Msg, init, update, and view too. Let’s do that.
module Page.NewPost exposing (Model, Msg, init, update, view)Next add NewPageMsg to the Msg type in Main.elm.
type Msg
    .
    .
    | EditPageMsg EditPost.Msg
    | NewPageMsg NewPost.Msg
And handle that message by adding a new branch to update in Main.elm.
update : Msg -> Model -> ( Model, Cmd Msg )
update msg model =
    case ( msg, model.page ) of
        .
        .
        ( EditPageMsg subMsg, EditPage pageModel ) ->
            ...

        ( NewPageMsg subMsg, NewPage pageModel ) ->
            let
                ( updatedPageModel, updatedCmd ) =
                    NewPost.update subMsg pageModel
            in
            ( { model | page = NewPage updatedPageModel }
            , Cmd.map NewPageMsg updatedCmd
            )

        ( _, _ ) ->
            ...
The branch for handling NewPageMsg looks very similar to the one that handles ListPageMsg which is already covered in the Updating Page Models section. This marks the completion of step 10 from the sequence diagram above. Step 11 and 12 are also in place already.
Step 13 - 17: Return NewPost View
We can take care of the rest of the steps by adding a new branch for NewPage to the currentView function in Main.elm.
currentView : Model -> Html Msg
currentView model =
    case model.page of
        .
        .
        EditPage pageModel ->
            ...

        NewPage pageModel ->
            NewPost.view pageModel
                |> Html.map NewPageMsg
If you don’t remember how Html.map works, you may want to review the Displaying Current Page section.
Testing the NewPost Page
We’re now ready to test the NewPost page. Run json-server and elm-live from the beginning-elm directory in separate terminal windows if they aren’t running already.
$ json-server --watch server/db.json -p 5019

$ elm-live post-app/Main.elm --pushstate
Check the elm-live window in terminal to make sure everything compiled successfully. Now go to http://localhost:8000 and you should see the Create new post link.
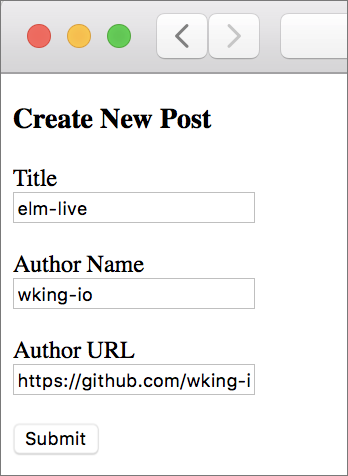
Click that link and you’ll be taken to the NewPost page. The URL in browser’s address bar will also change to http://localhost:8000/posts/new. Enter the following info into the text fields and click Submit.
- Title:
elm-live - Author Name:
wking-io - Author URL:
https://github.com/wking-io
If everything goes well, json-server will create a new post and you’ll be taken back to the ListPosts page.
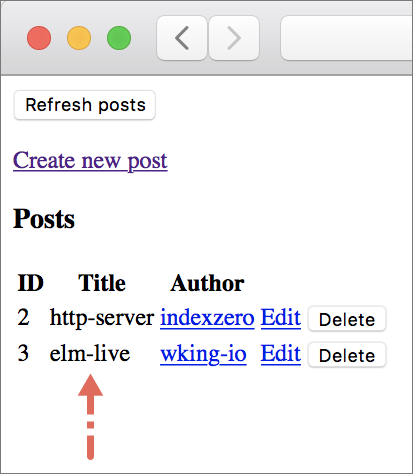
json-server incremented the id by 1 to 3 and assigned it to the new post. Originally, we had two posts. We then deleted the first post in the Deleting a Post section. It’s uncommon for the server to reuse a deleted resource’s id. You can also verify the creation of a new post by checking the server/db.json file.
{
  "posts": [
    .
    .
    {
      "title": "elm-live",
      "authorName": "wking-io",
      "authorUrl": "https://github.com/wking-io",
      "id": 3
    }
  ],
  .
  .
}
Summary
In this section, we learned how to create a new resource by sending a POST HTTP request to the server. The process for creating a new resource is very similar to how we update an existing resource. One major difference is we can’t include the id of a new resource in JSON body.