The JSON structure we retrieved from a server in the previous section is quite simple. It’s just an array of strings. Most real world Elm apps have to deal with a lot more complex structures. In this section, we will learn how to decode objects, nested values, nullable values, and many more types of JSON.
Decoding a JSON Object
In the Creating a Local JSON Server section, we retrieved the following JSON representing a resource called post.
{
  "id": 1,
  "title": "json-server",
  "author": "typicode"
}
It’s an object with three fields. To fully decode it, we need to first figure out how to individually decode each field. The field function in the Json.Decode module is just what we need. Run elm repl from the beginning-elm directory in terminal and try the following examples.
> import Json.Decode exposing (..)

> decodeString (field "id" int) "{ \"id\": 1 }"
Ok 1 : Result Error Int

> decodeString (field "title" string) "{ \"title\": \"json-server\" }"
Ok "json-server" : Result Error String

> decodeString (field "author" string) "{ \"author\": \"typicode\" }"
Ok "typicode" : Result Error String
Here is what the field function’s type signature looks like:
The decoder returned by field can be applied to JSON with more than one fields, but it only decodes the given field. As long as that field exists and its value matches the type of decoder, it will succeed.
> decodeString (field "id" int) "{ \"id\": 1, \"title\": \"json-server\" }"
Ok 1 : Result Error Int

> decodeString (field "id" int) "{ \"title\": \"json-server\" }"
Err (Failure ("Expecting an OBJECT with a field named `id`") <internals>)
    : Result Error Int
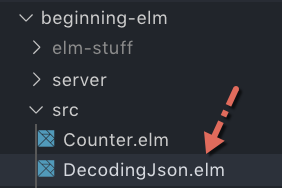
All examples we have seen so far are for decoding only one field. How do we decode multiple fields at the same time? We can do that with the map function from Json.Decode module. Before we look at how map works let’s create another Elm app so that we can experiment with various concepts as we go along. Create a new file called DecodingJson.elm in the beginning-elm/src directory.

Now add the following code to DecodingJson.elm. I encourage you to type the entire code instead of just copying and pasting. It will reinforce what you have learned so far about retrieving and decoding JSON.
module DecodingJson exposing (main)

import Browser
import Html exposing (..)
import Html.Events exposing (onClick)
import Http
import Json.Decode as Decode
    exposing
        ( Decoder
        , decodeString
        , field
        , int
        , list
        , map3
        , string
        )


type alias Post =
    { id : Int
    , title : String
    , author : String
    }


type alias Model =
    { posts : List Post
    , errorMessage : Maybe String
    }


view : Model -> Html Msg
view model =
    div []
        [ button [ onClick SendHttpRequest ]
            [ text "Get data from server" ]
        , viewPostsOrError model
        ]


viewPostsOrError : Model -> Html Msg
viewPostsOrError model =
    case model.errorMessage of
        Just message ->
            viewError message

        Nothing ->
            viewPosts model.posts


viewError : String -> Html Msg
viewError errorMessage =
    let
        errorHeading =
            "Couldn't fetch data at this time."
    in
    div []
        [ h3 [] [ text errorHeading ]
        , text ("Error: " ++ errorMessage)
        ]


viewPosts : List Post -> Html Msg
viewPosts posts =
    div []
        [ h3 [] [ text "Posts" ]
        , table []
            ([ viewTableHeader ] ++ List.map viewPost posts)
        ]


viewTableHeader : Html Msg
viewTableHeader =
    tr []
        [ th []
            [ text "ID" ]
        , th []
            [ text "Title" ]
        , th []
            [ text "Author" ]
        ]


viewPost : Post -> Html Msg
viewPost post =
    tr []
        [ td []
            [ text (String.fromInt post.id) ]
        , td []
            [ text post.title ]
        , td []
            [ text post.author ]
        ]


type Msg
    = SendHttpRequest
    | DataReceived (Result Http.Error (List Post))


postDecoder : Decoder Post
postDecoder =
    map3 Post
        (field "id" int)
        (field "title" string)
        (field "author" string)


httpCommand : Cmd Msg
httpCommand =
    Http.get
        { url = "http://localhost:5019/posts"
        , expect = Http.expectJson DataReceived (list postDecoder)
        }


update : Msg -> Model -> ( Model, Cmd Msg )
update msg model =
    case msg of
        SendHttpRequest ->
            ( model, httpCommand )

        DataReceived (Ok posts) ->
            ( { model
                | posts = posts
                , errorMessage = Nothing
              }
            , Cmd.none
            )

        DataReceived (Err httpError) ->
            ( { model
                | errorMessage = Just (buildErrorMessage httpError)
              }
            , Cmd.none
            )


buildErrorMessage : Http.Error -> String
buildErrorMessage httpError =
    case httpError of
        Http.BadUrl message ->
            message

        Http.Timeout ->
            "Server is taking too long to respond. Please try again later."

        Http.NetworkError ->
            "Unable to reach server."

        Http.BadStatus statusCode ->
            "Request failed with status code: " ++ String.fromInt statusCode

        Http.BadBody message ->
            message


init : () -> ( Model, Cmd Msg )
init _ =
    ( { posts = []
      , errorMessage = Nothing
      }
    , Cmd.none
    )


main : Program () Model Msg
main =
    Browser.element
        { init = init
        , view = view
        , update = update
        , subscriptions = \_ -> Sub.none
        }
Stop the JSON server if it’s running already by pressing Ctrl + c and restart it with server/db.json from the beginning-elm directory in terminal.
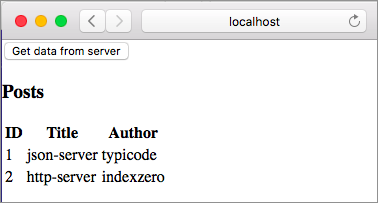
$ json-server --watch server/db.json -p 5019Now run elm reactor also from the beginning-elm directory in a separate terminal window if it’s not running already and load this URL in browser: http://localhost:8000/src/DecodingJson.elm. Click the Get data from server button and you should see the posts stored in db.json.

So far in this chapter, we have been building apps one step at a time. Here you are asked to type the entire code because most of the code in DecodingJson.elm looks very similar to what’s in HttpExamples.elm from the Decoding JSON - Part 1 section. Let’s go over three main areas where the code in DecodingJson.elm differs from HttpExamples.elm.
1. Model
We’re now storing posts instead of nicknames in our model. A post has more information than a nickname. Therefore, we created a separate type alias called Post to represent that information.
type alias Post =
    { id : Int
    , title : String
    , author : String
    }


type alias Model =
    { posts : List Post
    , errorMessage : Maybe String
    }
2. View
The overall structure of the view code hasn’t changed at all. The only noticeable difference is we are now using a table instead of a bulleted list to display the information retrieved from a server. Notice how we are assembling the header and standard table cells in viewPosts function.
viewPosts : List Post -> Html Msg
viewPosts posts =
    div []
        [ h3 [] [ text "Posts" ]
        , table []
            ([ viewTableHeader ] ++ List.map viewPost posts)
        ]
viewTableHeader returns Html Msg whereas the expression List.map viewPost posts returns List (Html Msg). They can’t be combined just by using commas. That’s why we weren’t able to write the viewPosts function like this:
viewPosts : List Post -> Html Msg
viewPosts posts =
    div []
        [ h3 [] [ text "Posts" ]
        , table []
            [ viewTableHeader
            , List.map viewPost posts
            ]
        ]
We wrapped the return value from viewTableHeader in a list and concatenated it with the value returned by List.map. After viewTableHeader and List.map are applied, the table code will look like this:
table []
    [ tr []
        [ th []
            [ text "ID" ]
        , th []
            [ text "Title" ]
        , th []
            [ text "Author" ]
        ]
    , tr []
        [ td []
            [ text "1" ]
        , td []
            [ text "json-server" ]
        , td []
            [ text "typicode" ]
        ]
    , tr []
        [ td []
            [ text "2" ]
        , td []
            [ text "http-server" ]
        , td []
            [ text "indexzero" ]
        ]
    ]
3. JSON Decoder
The decoder in DecodingJson.elm is slightly more complex than the one in HttpExamples.elm.
postDecoder : Decoder Post
postDecoder =
    map3 Post
        (field "id" int)
        (field "title" string)
        (field "author" string)
The Json.Decode module provides a series of map functions for decoding an object with multiple fields. map3 is used for decoding three fields and here is its type signature:
map3
    :  (a -> b -> c -> value)
    -> Decoder a
    -> Decoder b
    -> Decoder c
    -> Decoder value
The first argument is a function that takes the values decoded by each decoder and produces a new value. We supplied Post as that function in postDecoder. Whenever we use type alias to give a name to a record, we get a constructor function as a bonus.
Note: If you don’t remember how a constructor function works, you may want to refresh your memory by reading the Creating a Record section from chapter 3.
If we have only two fields in a JSON object, we need to use map2. Similarly, if we have four fields, we should reach for map4. The most we can decode is eight fields with map8. If we need more than that, we’ll have to either combine existing decoders or use a third-party package called elm-json-decode-pipeline. Let’s see how our decoder looks if we were to use this package. Install it by running the following command from the beginning-elm directory in terminal.
$ elm install NoRedInk/elm-json-decode-pipelineAnswer y when asked to add that package to elm.json. After that, import the Json.Decode.Pipeline module in DecodingJson.elm.
module DecodingJson exposing (main)

import Json.Decode.Pipeline exposing (optional, optionalAt, required, requiredAt)
.
.
Now we can rewrite postDecoder like this:
postDecoder : Decoder Post
postDecoder =
    Decode.succeed Post
        |> required "id" int
        |> required "title" string
        |> required "author" string
We replaced map3 with Decode.succeed and field with required. We also replaced parentheses with pipeline operators (|>). I don’t know about you, but I find the new version slightly easier to read.
The Decode.succeed function ignores the given JSON and always produces a specific value. Earlier, we specified Decode as an alias when importing the Json.Decode module. Let’s try some examples in elm repl to understand succeed better.
> import Json.Decode exposing (..)

> decodeString (succeed 42) "1"
Ok 42 : Result Error number

> decodeString (succeed 42) "true"
Ok 42 : Result Error number

> decodeString (succeed 42) "[1,2,3]"
Ok 42 : Result Error number
Json.Decode.Pipeline makes a clever use of succeed to turn the JSON decoding process into a pipeline operation. In a real project, you are most likely to use the functions defined in Json.Decode.Pipeline instead of the map functions from Json.Decode. So let’s spend some time exploring what else Json.Decode.Pipeline can do.
Decoding Optional Fields
Let’s imagine a scenario in which a server can’t always guarantee that a specific field will be present in a JSON response. We can create such a response by removing author from the first post in server/db.json.
{
  "posts": [
    {
      "id": 1,
      "title": "json-server"
    },
    .
    .
}
Refresh the page at http://localhost:8000/src/DecodingJson.elm and click the Get data from server button. You should see the following error.

Error messages in Elm are quite helpful, aren’t they? We can fix the error by using a function called optional. Modify postDecoder to use optional instead of required when decoding author.
postDecoder : Decoder Post
postDecoder =
    Decode.succeed Post
        |> required "id" int
        |> required "title" string
        |> optional "author" string "anonymous"
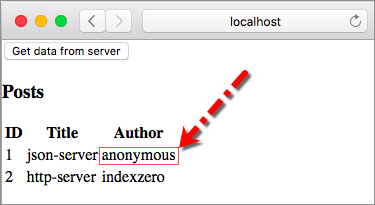
optional takes a field name, a decoder, and a fallback value. We’re using anonymous as the fallback value. Refresh the page at http://localhost:8000/src/DecodingJson.elm and click the Get data from server button once again. You should see anonymous listed as the first post’s author.

Decoding null Value
Sometimes servers assign null to a JSON field instead of removing it completely to signify the absence of a value. Add the author field back to db.json and assign null to it.
{
  "posts": [
    {
      "id": 1,
      "title": "json-server",
      "author": null
    },
    .
    .
}
Refresh the page at http://localhost:8000/src/DecodingJson.elm once again and click the Get data from server button. You should still see anonymous as the first post’s author. We don’t need to do anything extra to handle null. The optional function automatically takes care of it.
Decoding Nested Objects
Let’s change the structure of data in db.json so that we can provide more info about an author.
{
  "posts": [
    {
      "id": 1,
      "title": "json-server",
      "author": {
          "name": "typicode",
          "url": "https://github.com/typicode"
      }
    },
    {
      "id": 2,
      "title": "http-server",
      "author": {
          "name": "indexzero",
          "url": "https://github.com/indexzero"
      }
    }
  ],
.
.
}
What we have here is nested JSON objects. Before we start decoding them, we need to change our data model in DecodingJson.elm to accommodate this new structure by introducing a new record called Author.
type alias Author =
    { name : String
    , url : String
    }


type alias Post =
    { id : Int
    , title : String
    , author : Author
    }
The author field in Post is now of type Author. Instead of displaying urls in plain text, let’s make the author names clickable in viewPost.
viewPost : Post -> Html Msg
viewPost post =
    tr []
        [ td []
            [ text (String.fromInt post.id) ]
        , td []
            [ text post.title ]
        , td []
            [ a [ href post.author.url ] [ text post.author.name ] ]
        ]
Since href is defined in the Html.Attributes module we need to import that in DecodeJson.elm.
module DecodingJson exposing (main)

import Html.Attributes exposing (href)
.
.
We’re now ready to write decoders for nested objects. Replace the current implementation of postDecoder with the following code in DecodingJson.elm.
authorDecoder : Decoder Author
authorDecoder =
    Decode.succeed Author
        |> required "name" string
        |> required "url" string


postDecoder : Decoder Post
postDecoder =
    Decode.succeed Post
        |> required "id" int
        |> required "title" string
        |> required "author" authorDecoder
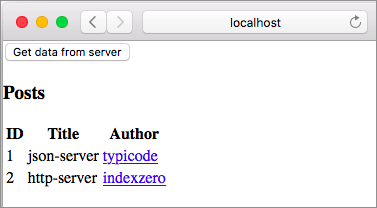
authorDecoder is slightly more complex than string, but it’s a decoder nonetheless. That’s why we were able to pass it to the required function in postDecoder to decode an author object. Refresh the page at http://localhost:8000/src/DecodingJson.elm and click the Get data from server button. The author names should be displayed as links.

Decoding Nested Fields with requiredAt
What if we want to store the author information inside Post itself instead of creating a separate record? Update Post’s definition to the following in DecodingJson.elm:
type alias Post =
    { id : Int
    , title : String
    , authorName : String
    , authorUrl : String
    }
How do we go about extracting values from a nested JSON and assign them to authorName and authorUrl fields? We can use the requiredAt function defined in the Json.Decode.Pipeline module for that. Update postDecoder in DecodingJson.elm like this:
postDecoder : Decoder Post
postDecoder =
    Decode.succeed Post
        |> required "id" int
        |> required "title" string
        |> requiredAt [ "author", "name" ] string
        |> requiredAt [ "author", "url" ] string
requiredAt takes a list of field names and traverses them in order. Once it reaches the last field, it applies the given decoder to it. We also need to replace post.author.url with post.authorUrl and post.author.name with post.authorName in viewPost.
viewPost : Post -> Html Msg
viewPost post =
    tr []
        .
        .
        , td []
            [ a [ href post.authorUrl ] [ text post.authorName ] ]
        ]
Refresh the page at http://localhost:8000/src/DecodingJson.elm and click the Get data from server button. The author names should still be displayed as links.
Decoding Nested Fields with at
The Json.Decode module we saw earlier also provides a function called at for decoding nested fields. You don’t have to implement this change, but if you wanted to rewrite postDecoder using at you could do it like this:
postDecoder : Decoder Post
postDecoder =
    map4 Post
        (field "id" int)
        (field "title" string)
        (at [ "author", "name" ] string)
        (at [ "author", "url" ] string)
Due to easier syntax, it’s better to use functions in the Json.Decode.Pipeline module instead of those defined in Json.Decode. The above example is included here in case you’re curious how to decode nested fields using the Json.Decode module.
Decoding Nested Fields with optionalAt
Remove url from the first post’s author object in db.json.
{
  "posts": [
    {
      "id": 1,
      "title": "json-server",
      "author": {
          "name": "typicode"
      }
    },
    .
    .
}
To decode posts, we now have to use the optionalAt function instead of requiredAt in postDecoder.
postDecoder : Decoder Post
postDecoder =
    Decode.succeed Post
        |> required "id" int
        |> required "title" string
        |> requiredAt [ "author", "name" ] string
        |> optionalAt [ "author", "url" ] string "http://dudeism.com"
If the url field doesn’t exist or is null, we want the decoder to use a fallback link. Refresh the page at http://localhost:8000/src/DecodingJson.elm and click the Get data from server button. Now click the name of the first post’s author. You should be taken to the official site of the slowest-growing religion in the world — Dudeism.
Cleaning Up
We’ll be extending the code in DecodingJson.elm and db.json in the future sections, so let’s clean those files up before moving on. To match our current definition of the Post type, we’ll use simple properties instead of nested objects to represent the author information. The posts property in db.json should look like this:
{
  "posts": [
    {
      "id": 1,
      "title": "json-server",
      "authorName": "typicode",
      "authorUrl": "https://github.com/typicode"
    },
    {
      "id": 2,
      "title": "http-server",
      "authorName": "indexzero",
      "authorUrl": "https://github.com/indexzero"
    }
  ],
  .
  .
}
Since the Author record isn’t needed anymore go ahead and remove its definition and decoder from DecodingJson.elm.
type alias Author =
    { name : String
    , url : String
    }


authorDecoder : Decoder Author
authorDecoder =
    Decode.succeed Author
        |> required "name" string
        |> required "url" string
Next replace requiredAt with required in postDecoder.
postDecoder : Decoder Post
postDecoder =
    Decode.succeed Post
        |> required "id" int
        |> required "title" string
        |> required "authorName" string
        |> required "authorUrl" string
The only thing remaining is to remove functions we aren’t using anymore from the imports in DecodingJson.elm. The Json.Decode and Json.Decode.Pipeline imports should look like the following after deletion.
module DecodingJson exposing (main)
.
.
import Json.Decode as Decode exposing (Decoder, int, list, string)
import Json.Decode.Pipeline exposing (required)
Refresh the page at http://localhost:8000/src/DecodingJson.elm and click the Get data from server button to make sure everything is still working.
Summary
In this section, we learned how to decode a JSON object with multiple fields. The third-party package NoRedInk/elm-json-decode-pipeline provides a much better experience for decoding JSON objects compared to the official package elm/json. We also learned how to decode nested objects and nullable fields.
Json.Decode and Json.Decode.Pipeline modules both contain a few more functions for decoding even more complex structures. You can learn all about them here and here.
In the next section, we’ll polish our UI with krisajenkins/remotedata — a third-party package for handling HTTP requests elegantly. Here is the entire code from DecodingJson.elm thus far:
module DecodingJson exposing (main)

import Browser
import Html exposing (..)
import Html.Attributes exposing (href)
import Html.Events exposing (onClick)
import Http
import Json.Decode as Decode exposing (Decoder, int, list, string)
import Json.Decode.Pipeline exposing (required)


type alias Post =
    { id : Int
    , title : String
    , authorName : String
    , authorUrl : String
    }


type alias Model =
    { posts : List Post
    , errorMessage : Maybe String
    }


view : Model -> Html Msg
view model =
    div []
        [ button [ onClick SendHttpRequest ]
            [ text "Get data from server" ]
        , viewPostsOrError model
        ]


viewPostsOrError : Model -> Html Msg
viewPostsOrError model =
    case model.errorMessage of
        Just message ->
            viewError message

        Nothing ->
            viewPosts model.posts


viewError : String -> Html Msg
viewError errorMessage =
    let
        errorHeading =
            "Couldn't fetch data at this time."
    in
    div []
        [ h3 [] [ text errorHeading ]
        , text ("Error: " ++ errorMessage)
        ]


viewPosts : List Post -> Html Msg
viewPosts posts =
    div []
        [ h3 [] [ text "Posts" ]
        , table []
            ([ viewTableHeader ] ++ List.map viewPost posts)
        ]


viewTableHeader : Html Msg
viewTableHeader =
    tr []
        [ th []
            [ text "ID" ]
        , th []
            [ text "Title" ]
        , th []
            [ text "Author" ]
        ]


viewPost : Post -> Html Msg
viewPost post =
    tr []
        [ td []
            [ text (String.fromInt post.id) ]
        , td []
            [ text post.title ]
        , td []
            [ a [ href post.authorUrl ] [ text post.authorName ] ]
        ]


type Msg
    = SendHttpRequest
    | DataReceived (Result Http.Error (List Post))


postDecoder : Decoder Post
postDecoder =
    Decode.succeed Post
        |> required "id" int
        |> required "title" string
        |> required "authorName" string
        |> required "authorUrl" string


httpCommand : Cmd Msg
httpCommand =
    Http.get
        { url = "http://localhost:5019/posts"
        , expect = Http.expectJson DataReceived (list postDecoder)
        }


update : Msg -> Model -> ( Model, Cmd Msg )
update msg model =
    case msg of
        SendHttpRequest ->
            ( model, httpCommand )

        DataReceived (Ok posts) ->
            ( { model
                | posts = posts
                , errorMessage = Nothing
              }
            , Cmd.none
            )

        DataReceived (Err httpError) ->
            ( { model
                | errorMessage = Just (buildErrorMessage httpError)
              }
            , Cmd.none
            )


buildErrorMessage : Http.Error -> String
buildErrorMessage httpError =
    case httpError of
        Http.BadUrl message ->
            message

        Http.Timeout ->
            "Server is taking too long to respond. Please try again later."

        Http.NetworkError ->
            "Unable to reach server."

        Http.BadStatus statusCode ->
            "Request failed with status code: " ++ String.fromInt statusCode

        Http.BadBody message ->
            message


init : () -> ( Model, Cmd Msg )
init _ =
    ( { posts = []
      , errorMessage = Nothing
      }
    , Cmd.none
    )


main : Program () Model Msg
main =
    Browser.element
        { init = init
        , view = view
        , update = update
        , subscriptions = \_ -> Sub.none
        }