In chapter 7, we built a single-page app for creating, reading, updating, and deleting posts from an HTTP server. What happens to the app when the server is unreachable? Let’s find out. Run the following commands from the beginning-elm directory in separate terminal windows to launch the app.
$ json-server --watch server/db.json -p 5019
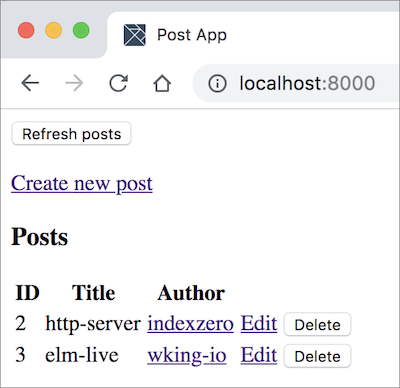
$ elm-live post-app/Main.elm --pushstateNow go to http://localhost:8000 in a browser and you should see two posts.
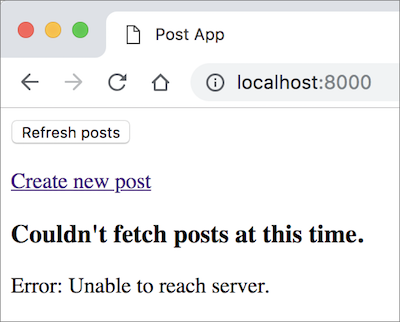
Stop json-server by pressing Ctrl + c and reload the page at http://localhost:8000. You should now see an error.
It would be great if we could display posts from the previous fetch as soon as our app loads even if the server is unreachable. As it turns out, all client-side web apps can in fact store data locally in a browser through the use of a technology called Web Storage which provides two different ways for saving data:
-
Session Storage - Data stored in session storage is available until the browser is closed.
-
Local Storage - Data stored in local storage is available even if the browser is closed and reopened.
Let’s store the state of our app in local storage. Unfortunately, Elm doesn’t provide a package for directly accessing local storage. We’ll have to go through JavaScript.
Note: The Elm development team is working hard to expand support for all technologies included in the Web Platform. Local storage is one of them. In the meantime, the recommended approach is to use JavaScript APIs through ports.
Creating an Outgoing Port
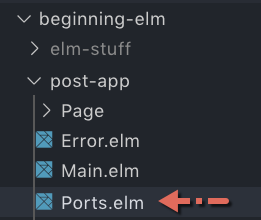
Let’s start by defining an outgoing port for sending the app state to JavaScript. Create a new file called Ports.elm in the beginning-elm/post-app directory and add the code below to it.
port module Ports exposing (storePosts)


port storePosts : String -> Cmd msg
Our plan is to transform all Post records in our app to a JSON string and then store that string in local storage. That’s why the storePosts port takes a string as an input instead of a list of posts like this:
port storePosts : List Post -> Cmd msgIn the Model View Update - Part 1 section, we learned that the state of an app is typically represented by a model. So why are we storing only posts and not everything inside our main and page models? That’s because we just need to store enough data to bring the app back to a usable state. In our case, all we need is a list of posts.
Next we’ll write a function for transforming posts to a JSON string. Add the following code to the bottom of Post.elm.
savePosts : List Post -> Cmd msg
savePosts posts =
    Encode.list postEncoder posts
        |> Encode.encode 0
        |> Ports.storePosts
savePosts not only transforms posts into JSON, but also calls the storePosts port function. So to send posts through that port all we have to do is call savePosts.
The Encode.list decoder converts an Elm list into a JSON array. Here’s what its type signature looks like:

The Encode.encode function converts a Value into an actual JSON string. Here’s what its type signature looks like:

All encoders we’ve used so far produce a Value. They don’t actually create a JSON string. That’s the job for encode.
-- Transform an Elm string into a JSON string value
string : String -> Value

-- Transform an Elm int into a JSON number value
int : Int -> Value

-- Transform an Elm list into a JSON array value
list : (a -> Value) -> List a -> Value

-- Convert a Value to an actual JSON string
encode : Int -> Value -> String
We didn’t have to use encode when editing and creating a post in chapter 7 because the Http.request and Http.post functions converted an encoded Value to a JSON string for us behind the scenes. Here we have to do that conversion ourselves because ports don’t do it. Let’s expose savePosts and import the Ports module in Post.elm.
module Post exposing
    .
    .
    , savePosts
    )

import Ports
.
.
Sending Posts to JavaScript
Where in our app would be a good place to initiate the process of saving posts in local storage? Since we always end up fetching all posts from the ListPosts page after creating a new post or editing an existing one, the PostsReceived response -> branch inside ListPosts.elm’s update function is a good place to call the savePosts function from.
update : Msg -> Model -> ( Model, Cmd Msg )
update msg model =
    case msg of
        .
        .
        PostsReceived response ->
            ( { model | posts = response }
            , savePosts response
            )
        .
        .
Unfortunately that’s not going to work because response is of type WebData (List Post). We need to pull posts out of WebData. Luckily, the RemoteData module provides a function called withDefault that does exactly what we need here. Here’s what its type signature looks like:

Change the PostsReceived response -> branch in update to the following.
update : Msg -> Model -> ( Model, Cmd Msg )
update msg model =
    case msg of
        .
        .
        PostsReceived response ->
            let
                actualPosts =
                    RemoteData.withDefault [] response
            in
            ( { model | posts = response }
            , savePosts actualPosts
            )
        .
        .
Although this implementation works, it introduces a subtle bug: An empty list is saved in local storage even if we failed to fetch posts from the server. We don’t want that. savePosts shouldn’t be called at all if we don’t have actual posts. Let’s use the following implementation instead.
update : Msg -> Model -> ( Model, Cmd Msg )
update msg model =
    case msg of
        .
        .
        PostsReceived response ->
            let
                savePostsCmd =
                    case response of
                        RemoteData.Success actualPosts ->
                            savePosts actualPosts

                        _ ->
                            Cmd.none
            in
            ( { model | posts = response }, savePostsCmd )
        .
        .
Now expose savePosts when importing the Post module in ListPosts.elm.
import Post exposing (Post, PostId, postsDecoder, savePosts)Storing Posts in Local Storage
That’s all we need to do on the Elm side. Check the elm-live window in terminal to make sure there are no errors. Now let’s turn our attention to JavaScript. Replace the contents of beginning-elm/index.html with the following.
<!DOCTYPE html>
<html>
<body>
    <script src="elm.js"></script>
    <script>
      var app = Elm.Main.init();
    </script>
</body>
</html>
For comparison, here is the index.html file we used to send data to JavaScript from a non-single-page Elm app:
<!DOCTYPE html>
<html>
<body>
    <div id="elm-code-is-loaded-here"></div>

    <script src="elm.js"></script>
    <script>
      var app = Elm.PortExamples.init({
        node: document.getElementById("elm-code-is-loaded-here")
      });
      .
      .
    </script>
</body>
</html>
Did you notice the difference? We had to embed our Elm app inside a div in the latter case. We don’t have to do that in a single-page app because it takes over the entire HTML document. Simply loading elm.js is enough.
Next we need to put the compiled code in elm.js. Stop elm-live by pressing Ctrl + c and restart it by running the following command from the beginning-elm directory in terminal.
$ elm-live post-app/Main.elm --pushstate -- --output=elm.jsIn the previous sections of this chapter we used elm make to produce elm.js like this:
$ elm make src/PortExamples.elm --output elm.jsWhy can’t we use elm make here too? That’s because post-app is a single-page app and we need the pushstate feature from elm-live to be able to navigate between pages. That being said, elm-live actually calls elm make behind the scenes to compile our code.
It’s important to note that elm-live requires us to put all elm make specific flags after the -- separator. If we don’t use the --output flag, elm make will automatically create a file called index.html in the directory from where it’s run and put the compiled code in that file instead. We don’t want that.
Listening to the storePosts Port
Now it’s time to subscribe to the storePosts port by adding the following code to the bottom of the <script> tag in index.html.
<script>
.
.
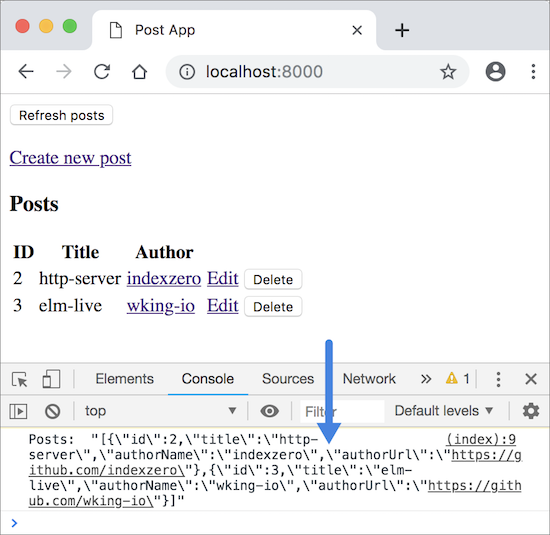
app.ports.storePosts.subscribe(function(posts) {
console.log("Posts: ", JSON.stringify(posts));
});
</script>We need to make sure the posts sent by our Elm app actually made it to the JavaScript side before we save them in local storage. That’s why we’re printing them in console first. Make sure both elm-live and json-server are running. Then go to http://localhost:8000 and open the browser console. You should see the posts in raw JSON string format.
Now update the callback function in index.html to actually save the posts in local storage.
<script>
    .
    .
    app.ports.storePosts.subscribe(function(posts) {
        if (posts.length > 0) {
            var postsJson = JSON.stringify(posts);
            localStorage.setItem('post-app-save', postsJson);
            console.log("Saved state: ", postsJson);
        }
    });
</script>
We’re using the setItem function in localStorage to save the posts. setItem takes a key value pair. post-app-save is the key and the raw JSON string produced by JSON.stringify is the value.
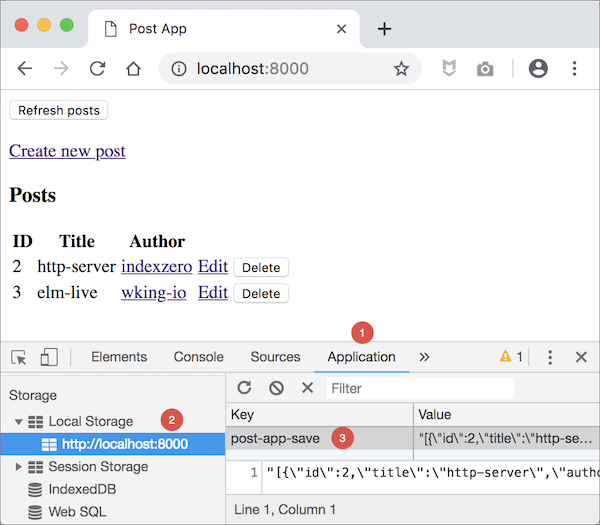
If you are using Chrome, you can check whether or not the data was indeed saved in local storage by opening the developer tools and going to the Application tab as shown in the figure below.
Summary
In this section, we learned how to save the state of our Elm app in browser’s local storage. Since Elm doesn’t provide a package for that, we had to send the app state through an outgoing port and use JavaScript API on the other end to actually save it. In the next section, we’ll learn how to restore the state when our app is being initialized.