In this section, we’ll learn how to properly route users to the correct page. Elm provides the following modules to facilitate routing in an app.
Browser.NavigationUrlUrl.ParserUrl.BuilderUrl.Parser.Query
The routing logic for our app is relatively simple. Therefore, we only need the first three modules from the list above. Browser.Navigation is included in the elm/browser package, which was installed automatically when we ran elm make after our project was initialized in the Building a Simple Page with Elm section in chapter 2.
The rest of the modules are included in the elm/url package which is also installed already but as an indirect dependency. Let’s make it a direct dependency by running the following command from the beginning-elm directory in terminal.
$ elm install elm/urlAnswer y when asked to update elm.json. Before we implement the routing logic, we need to know which URL will be used to access the ListPosts page. Back in the Creating a Local JSON Server section, we used the http://localhost:5019/posts URL to fetch all posts in our database file (server/db.json).
[
  {
    "id": 1,
    "title": "json-server",
    "authorName": "typicode",
    "authorUrl": "https://github.com/typicode"
  },
  {
    "id": 2,
    "title": "http-server",
    "authorName": "indexzero",
    "authorUrl": "https://github.com/indexzero"
  }
]
To retrieve an individual post, we appended its ID to the end like this: http://localhost:5019/posts/1.
{
  "id": 1,
  "title": "json-server",
  "authorName": "typicode",
  "authorUrl": "https://github.com/typicode"
}
We’ll be using a similar URL pattern for accessing the list and edit pages.
- Full URL for the list page:
http://localhost:8000/posts - Full URL for the edit page:
http://localhost:8000/posts/1
The Url Type
The Url module defines a type alias by the same name. Here’s how its definition looks:
type alias Url =
    { protocol : Protocol
    , host : String
    , port_ : Maybe Int
    , path : String
    , query : Maybe String
    , fragment : Maybe String
    }
And here’s the definition for the Protocol type:
type Protocol
    = Http
    | Https
The following diagram maps the fields in a Url record to various parts of an actual url.

Extracting Route From URL
We should never use a full URL to navigate to a certain page. This is because the URL will change as we move our code through different environments. Right now we are building post-app on a local machine with localhost:8000 as its address. When it’s ready for production we’ll need to deploy it to some other environment whose address will be different. If we use URL to navigate, the address won’t match and our app will break. We can avoid this issue by using paths instead.

Paths are generally represented as strings. It would be great if we could convert them to custom types.
That way the compiler will warn us if we make a mistake while typing. Let’s define a type called Route. Create a new file named Route.elm in the post-app directory and add the code below to it.
module Route exposing (Route(..), parseUrl)

import Url exposing (Url)
import Url.Parser exposing (..)


type Route
    = NotFound
    | Posts


parseUrl : Url -> Route
parseUrl url =
    case parse matchRoute url of
        Just route ->
            route

        Nothing ->
            NotFound


matchRoute : Parser (Route -> a) a
matchRoute =
    oneOf
        [ map Posts top
        , map Posts (s "posts")
        ]
The parseUrl function uses parse — defined in the Url.Parser module — to extract a path from the given url and translate it to one of the values in the Route type. The parse function, in turn, uses matchRoute to check if the given url contains one of these routes:
Posts- represents theListPostspage.NotFound- represents the not-found page. We’ll create this page later.
If yes, parseUrl returns that route wrapped in Just. Otherwise it returns NotFound to indicate that the given url doesn’t contain a route for any of the resources in the app.
Note: We haven’t defined a route for the EditPosts page yet. We’ll do that in the next section when we create that page.
Matching Routes
matchRoute defines parsers that know how to extract a given path from a url.
matchRoute : Parser (Route -> a) a
matchRoute =
    oneOf
        [ map Posts top
        , map Posts (s "posts")
]- Parser
- A parser is a component in a software program that takes some input data, checks for correct syntax, and builds a data structure which is easier to operate on compared to the original format. In our case the input data is a url. If the url is in correct format then the parser starts to look for a given path in it. If a match is found, it translates that path to one of the data constructors from the
Routetype.
The table below shows which parser is responsible for matching which path in a given url.
| URL | Path | Parser | Route |
|---|---|---|---|
http://localhost:8000 |
top |
Posts |
|
http://localhost:8000/posts |
/posts |
s "posts" |
Posts |
Notice how the first row doesn’t specify any path. If a path is missing, we want to take the user to the list page. top defines a parser that doesn’t look for any path. The s function also defines a parser, but it takes a path as an argument. Both top and s are defined in the Url.Parser module.

Note: We’ll dig deeper into s and other parsers from Url.Parser later in the Primitive Parsers and Custom Parsers sections.
The oneOf function executes the parsers one at a time starting from the top. It stops as soon as a match is found for the entire path and not just a portion of it.
Storing Current Route
For routing to work properly, we need to know which page the user is currently on. Let’s store that information in Main. Add the following code to the bottom of Main.elm.
type alias Model =
    { route : Route
    , page : Page
    }


type Page
    = NotFoundPage
    | ListPage ListPosts.Model
And import the Route module in Main.elm.
module Main exposing (main)

import Route exposing (Route)
.
.
We’re storing both current route and page in our main model. We’ll determine which page to navigate to based on the current route. To make things easier to manage, we’ve created a new type called Page in Main instead of using the page modules directly.
Why are we storing the page model as a payload in the ListPage data constructor but not in NotFoundPage? You’ll soon see that the not-found page is nothing but a simple view with no state. However, all other pages in our app will have their own states. For example, the ListPosts page uses the following data structure to store its state.
type alias Model =
    { posts : WebData (List Post)
    }
We’ll be passing this state to the page’s view function later. Don’t worry if some of this doesn’t make sense yet. Once we write some concrete code it’ll all be clear.
Routing to the Correct Page
The overall process for routing users to the correct page can be summarized in the following steps.
Step 1. Enter a full url in the browser’s address bar.
Step 2. Convert the url from step 1 to Url type. This is done by the Elm runtime behind the scenes.
Step 3. Extract a route from url and store it in the route field inside Main module’s model.
Step 4. Determine which page to display based on route.
Step 5. Ask the page from step 4 to return its model by calling its init function.
Step 6. Pass the model from step 5 to that page’s view function.
Initializing the Main Model
Steps 1 and 2 are already in place. Let’s implement step 3 by adding the init function to the bottom of Main.elm.
init : () -> Url -> Nav.Key -> ( Model, Cmd Msg )
init flags url navKey =
    let
        model =
            { route = Route.parseUrl url
            , page = NotFoundPage
            , navKey = navKey
            }
    in
    initCurrentPage ( model, Cmd.none )
We need to import the Browser.Navigation and Url modules in Main.elm.
module Main exposing (main)

import Browser.Navigation as Nav
import Url exposing (Url)
.
.
The init function in ListPosts.elm took flags as the only parameter.
init : () -> ( Model, Cmd Msg )
init _ =
    ( { posts = RemoteData.Loading }, fetchPosts )
Note: Since we didn’t use flags anywhere inside the init function’s body, we replaced it with _. If you don’t remember why we need to include that parameter even if it’s not used, you may want to review the Commands section from chapter 5.
In contrast, the init function in Main.elm takes two additional parameters: url and navKey.
url
This parameter represents the full url of a specific page. In our app, this can be either the home page (http://localhost:8000) or the list posts page (http://localhost:8000/posts) or any other page we might add in the future. We need to extract a route from this url by using the Route.parseUrl function we created earlier in the Extracting Route From URL section and store it in the route field.
model =
    { route = Route.parseUrl url
    .
    .
navKey
A navigation key is needed to create commands that will tell the Elm runtime to change the url in a browser’s address bar. You’ll see an example of such a command shortly. We don’t need to create a navigation key by ourselves. The runtime will create one for us and pass it to the init function when our app is being initialized. We need to add navKey to the model in Main.elm.
type alias Model =
    { route : Route
    , page : Page
    , navKey : Nav.Key
    }
Defining Messages
Each page in our app will have its own Msg type. To properly manage the interaction between pages, the Main module needs to define a separate higher level Msg type of its own. Add the following code below the Page type in Main.elm.
type Msg
    = ListPageMsg ListPosts.Msg
The ListPageMsg data constructor represents all messages meant to be handled by the ListPosts module. The Main module doesn’t handle any page specific messages. It simply forwards them to the correct page module.
Initializing the Current Page
The init function in Main has two responsibilities:
- Initialize the main model.
- Initialize the current page.
It delegates the second responsibility to the initCurrentPage function. Let’s implement that function by adding the following code below init in Main.elm.
initCurrentPage : ( Model, Cmd Msg ) -> ( Model, Cmd Msg )
initCurrentPage ( model, existingCmds ) =
    let
        ( currentPage, mappedPageCmds ) =
            case model.route of
                Route.NotFound ->
                    ( NotFoundPage, Cmd.none )

                Route.Posts ->
                    let
                        ( pageModel, pageCmds ) =
                            ListPosts.init
                    in
                    ( ListPage pageModel, Cmd.map ListPageMsg pageCmds )
    in
    ( { model | page = currentPage }
    , Cmd.batch [ existingCmds, mappedPageCmds ]
    )
initCurrentPage takes the main model and any commands we may want to fire when the app is being initialized. It then looks at the current route and determines which page to initialize. If the route is NotFound, we need to display the NotFoundPage which doesn’t need to be initialized. But if the current route is Posts, we need to initialize the ListPosts page by calling its init function which looks like this:
init : () -> ( Model, Cmd Msg )
init _ =
    ( { posts = RemoteData.Loading }, fetchPosts )
Now that Main has its own init, we don’t need to pass flags to ListPosts.init. Let’s remove that parameter from ListPosts.elm.
init : ( Model, Cmd Msg )
init =
    ( { posts = RemoteData.Loading }, fetchPosts )
ListPosts.init returns a model and commands specific to that page. The next step is to add the page model as a payload to the ListPage data constructor and map page commands in Main.elm.
Mapping Page Commands
Although each page is capable of creating its own commands, it can’t fire them off to the Elm runtime. That responsibility lies with the Main module. The page commands are designed to send a page specific message after they are executed. For example, the fetchPosts command in ListPosts.elm sends the PostsReceived message, which is also defined in ListPosts.elm.
fetchPosts : Cmd Msg
fetchPosts =
    Http.get
        { url = "http://localhost:5019/posts/"
        , expect =
            postsDecoder
                |> Http.expectJson (RemoteData.fromResult >> PostsReceived)
        }


type Msg
    = FetchPosts
    | PostsReceived (WebData (List Post))
Unfortunately, the Main module isn’t aware of the PostsReceived message. All it knows is that the ListPosts module has a type called Msg. It doesn’t know the internal details of that type because in ListPost’s module definition we didn’t use (..) after Msg.
Note: If you don’t remember how (..) works, you may want to review the Creating a Module section from chapter 4.
module Page.ListPosts exposing (Model, Msg, init, update, view)We did that on purpose because we don’t want any outside code to know about the specific messages a page can handle. This encapsulation makes our code easier to maintain in the long run.
Because Main doesn’t know anything about the page specific messages, it needs to map them to one of the data constructors from its own Msg type using the Cmd.map function. The Route.Posts branch from initCurrentPage does exactly that.
Route.Posts ->
    let
        ( pageModel, pageCmds ) =
            ListPosts.init
    in
    ( ListPage pageModel, Cmd.map ListPageMsg pageCmds )
The diagram below explains different parts of Cmd.map’s type signature.

Now that we’re done mapping page commands, all that is left is to combine existingCmds with mappedPageCmds. We can do that by using the Cmd.batch function.
initCurrentPage : ( Model, Cmd Msg ) -> ( Model, Cmd Msg )
initCurrentPage ( model, existingCmds ) =
    .
    .
    , Cmd.batch [ existingCmds, mappedPageCmds ]
    )
Here’s what Cmd.batch’s type signature looks like:
Cmd.batch : List (Cmd msg) -> Cmd msgCmd.batch takes a list of commands and batches them together so that we can hand them all to the runtime at the same time. The runtime then executes them in an arbitrary order.
Displaying the Current Page
Now that we’ve determined which page the user should be navigated to based on the current route, we need to figure out how to actually display that page. We’ll do that by adding the following code to the bottom of Main.elm.
view : Model -> Html Msg
view model =
    case model.page of
        NotFoundPage ->
            notFoundView

        ListPage pageModel ->
            ListPosts.view pageModel
                |> Html.map ListPageMsg


notFoundView : Html msg
notFoundView =
    h3 [] [ text "Oops! The page you requested was not found!" ]
If the current page is NotFoundPage, an error message is displayed. Otherwise, the responsibility for displaying the page is delegated to its view function.
As mentioned in the Mapping Page Commands section above, the page specific messages should be transformed to a main message. When we’re dealing with commands, that transformation happens through Cmd.map. But when we’re dealing with HTML, we need to use the Html.map function. The following diagram illustrates the difference between their type signatures.

We need to import the Html module in Main.elm.
module Main exposing (main)

import Html exposing (..)
.
.
Updating Page Models
We now know how to initialize and display the current page. Next we need to figure out how to update the current page’s model. Add the following code to the bottom of Main.elm.
update : Msg -> Model -> ( Model, Cmd Msg )
update msg model =
    case ( msg, model.page ) of
        ( ListPageMsg subMsg, ListPage pageModel ) ->
            let
                ( updatedPageModel, updatedCmd ) =
                    ListPosts.update subMsg pageModel
            in
            ( { model | page = ListPage updatedPageModel }
            , Cmd.map ListPageMsg updatedCmd
            )

        ( _, _ ) ->
            ( model, Cmd.none )
The update function above takes a main message and the main model as inputs. The Main module isn’t responsible for updating page models. That responsibility lies with page modules. That’s why we need to call a page specific update function to get an updated page model and a new list of page commands.
( updatedPageModel, updatedCmd ) =
    ListPosts.update subMsg pageModel
Once we have an updated page model, we simply store it in the main model’s page field. We then transform the messages produced by page commands to a main message using Cmd.map.
( { model | page = ListPage updatedPageModel }
, Cmd.map ListPageMsg updatedCmd
)
We also added a catch-all branch to update so that we won’t have to handle every permutation of the Msg and Page types as we add more data constructors to those types in the future.
update : Msg -> Model -> ( Model, Cmd Msg )
update msg model =
    case ( msg, model.page ) of
        .
        .
        ( _, _ ) ->
            ( model, Cmd.none )
Navigating to the Current Page
So far we’ve implemented the code for determining what the current page should be and how to display it. But we haven’t specified how to navigate to that page yet. Let’s do that by replacing the main function in Main.elm with the following.
main : Program () Model Msg
main =
    Browser.application
        { init = init
        , view = view
        , update = update
        , subscriptions = \_ -> Sub.none
        , onUrlRequest = LinkClicked
        , onUrlChange = UrlChanged
        }
Here’s what it looked like before:
main : Program () ListPosts.Model ListPosts.Msg
main =
    Browser.element
        { init = ListPosts.init
        , view = ListPosts.view
        , update = ListPosts.update
        , subscriptions = \_ -> Sub.none
        }
We’re now using Model, Msg, init, view, and update from the Main module instead of relying on ListPosts. We also replaced Browser.element with Browser.application.
- Browser.sandbox vs Browser.element vs Browser.application
- In the Commands section, we compared
Browser.sandboxwithBrowser.element. Both of those functions create small Elm programs that are meant to be embedded in a larger JavaScript application. This fact isn’t apparent when we useelm reactorbecause it automatically embeds our app behind the scenes. -
However, if we build our app by manually compiling the Elm code to JavaScript as shown in the
elm-makesection from chapter 2 then it becomes quite clear that bothBrowser.sandboxandBrowser.elementcreate Elm programs that are meant to take over a specific HTML element in a larger JavaScript application. -
A good way to introduce Elm at work is by implementing a small feature using either
Browser.sandboxorBrowser.elementand embedding it in a larger JavaScript application. If that feature is a success and the team is happy working with Elm, you may continue implementing more features in Elm. Eventually, you’ll need the ability to navigate between multiple pages implemented in Elm. That’s when you’ll reach forBrowser.applicationwhich provides a robust mechanism for managing multiple pages. -
To be clear, even if the user thinks an Elm app has multiple pages, behind the scenes it’s just a single page doing all the work. During initialization, the HTML code for all pages is loaded at once. When a link to an internal page is clicked, the app overwrites the contents of the current page instead of loading a new page from a server and simply changes the URL in a browser’s address bar.
-
If you’re working on a greenfield project that requires users to navigate to different parts of the application, you can start directly with
Browser.application. Otherwise it’s better to start small withBrowser.sandboxand work your way up toBrowser.application.
Navigation Scenarios
In any Elm app, there are three navigation scenarios we need to handle:
- When the application starts
- When the user clicks a link
- When the URL is changed
Let’s go through these scenarios one by one.
Navigation Scenario 1: When the Application Starts
Although we have already handled this scenario, let’s go through it once again to understand what really happens when an Elm app starts. The Elm runtime takes the full URL entered by the user in a browser’s address bar and gives it to the Main.init function as the second argument as shown below.
init : () -> Url -> Nav.Key -> ( Model, Cmd Msg )
init flags url navKey =
    let
        model =
            { navKey = navKey
            , route = Route.parseUrl url
            , page = NotFoundPage
            }
    in
    initCurrentPage ( model, Cmd.none )
Main.init then extracts a route from that URL by using the Route.parseUrl function and saves it in the main model. Based on that route, it also determines which page to display. The following sequence diagram shows all the steps our app goes through when it starts.

Navigation Scenario 2: When the User Clicks a Link
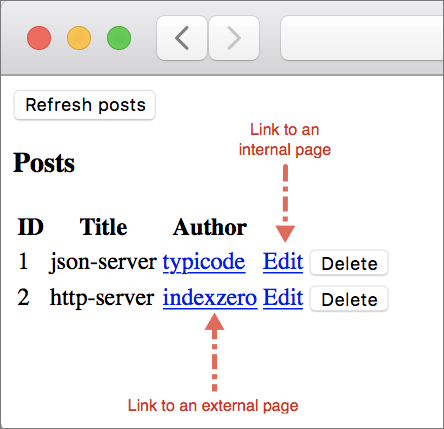
The second scenario we need to handle is when the user clicks a link included in our app. This could be a link to an external page, for example an author’s Github profile or a link to an internal page such as the EditPosts page which we’ll add in the Creating Edit Post Page section later in this chapter.
Whenever a link is clicked, the Elm runtime doesn’t take the user to that URL directly. It delegates that responsibility to our app by sending the message assigned to the onUrlRequest field in main to the Main module’s update function. Because of this, we now have the ability to save scroll position or persist data or perform some other operation before actually taking users to where they want to go.
main : Program () Model Msg
main =
    Browser.application
        .
        .
        , onUrlRequest = LinkClicked
        .
        .
        }
Although we’ve already assigned LinkClicked to onUrlRequest, we haven’t defined that message yet. Let’s do that by adding it to the Msg type in Main.elm.
type Msg
    = ListPageMsg ListPosts.Msg
    | LinkClicked UrlRequest
LinkClicked takes a payload of type UrlRequest, which is defined in the Browser module like this:
type UrlRequest
    = Internal Url
    | External String
Note: If you don’t remember how the Url type works, you may want to refresh your memory by reviewing the Url Type section above.
Let’s expose UrlRequest from the Browser module in Main.elm.
module Main exposing (main)

import Browser exposing (UrlRequest)
.
.
Handling LinkClicked Message
Next we need to handle the LinkClicked message in update. Add a new branch to the update function in Main.elm as shown below.
update : Msg -> Model -> ( Model, Cmd Msg )
update msg model =
    case ( msg, model.page ) of
        ( ListPageMsg subMsg, ListPage pageModel ) ->
            ...

        ( LinkClicked urlRequest, _ ) ->
            case urlRequest of
                Browser.Internal url ->
                    ( model
                    , Nav.pushUrl model.navKey (Url.toString url)
                    )

                Browser.External url ->
                    ( model
                    , Nav.load url
                    )

        ( _, _ ) ->
            ( model, Cmd.none )
We need to move the catch-all branch to the bottom, otherwise none of the branches below it will get executed. As mentioned in the Case expression section, it’s important to place the most specific pattern at the top and the least specific at the bottom.
Internal Link vs External Link
As long as a link has the same protocol, host name, and port number as the app, it’s considered internal. Otherwise, it’s an external link.
If our app is hosted at http://example.com:8000 then all of the following links are considered internal.
/posts/posts/1/posts?tag=functional/posts/1#intro//example.com/postshttp://example.com/posts
Whereas the links below are considered external.
http://github.comhttps://example.comhttps://example.com/postshttp://example.com:4000
Handling an Internal Link
If the user clicks an internal link, we simply change the URL in a browser’s address bar without loading a new page or reloading the current one. The pushUrl function from the Browser.Navigation module does exactly that. This is what enables us to create single-page apps in Elm. Here’s the branch for handling internal links in the Main module’s update function:
Browser.Internal url ->
    ( model
    , Nav.pushUrl model.navKey (Url.toString url)
    )
Here’s what pushUrl’s type signature looks like:
pushUrl : Key -> String -> Cmd msgA navigation Key is needed to create navigation commands that change the URL in a browser’s address bar. We’ve saved the navigation Key given to us by the Elm runtime when our app starts in the navKey field in main model.
init : () -> Url -> Nav.Key -> ( Model, Cmd Msg )
init flags url navKey =
    let
        model =
            { navKey = navKey
            .
            .
Note: There are three other functions in the Browser.Navigation module that require a navigation key: replaceUrl, back, and forward. We won’t cover those functions here, but feel free to check out their documentation to understand how they work.
UrlRequest’s definition shows that the internal link is actually of type Url and not String.
type UrlRequest
    = Internal Url
    | External String
That’s why we need to use the Url.toString function to convert Url to String. Url.toString systematically builds a full URL by combining various fields in the Url type.
If we have to convert Url to String anyway why not simply use String in the first place? Although our app doesn’t do anything other than changing the URL inside Browser.Internal url -> branch in update, more complex apps may want to do additional work depending on what’s in the Url fields.
Browser.Internal url ->
    ( model
    , Nav.pushUrl model.navKey (Url.toString url)
    )
In contrast, when handling an external link all we need to do is load a new page regardless of what’s inside a URL. That’s why the payload for the External data constructor in UrlRequest is of type String and not Url.
Handling an External Link
If the user clicks an external link, we need to leave our app and load the given URL. The Nav.load function does exactly that. Here’s the branch for handling external links in the Main module’s update function:
Browser.External url ->
    ( model
    , Nav.load url
    )
The diagram below illustrates the difference between Nav.load and Nav.pushUrl.

Both Nav.pushUrl and Nav.load add an entry to the browser history, so the back and forward buttons work as expected. It’s important to note that both Nav.pushUrl and Nav.load return a command because the process of changing the URL in a browser’s address bar causes a side effect.
Not sure if you noticed, but we didn’t tell Nav.pushUrl or Nav.load which message to send back to our app once the URL has been changed.
( LinkClicked urlRequest, _ ) ->
    case urlRequest of
        Browser.Internal url ->
            ( model
            , Nav.pushUrl model.navKey (Url.toString url)
            )

        Browser.External url ->
            ( model
            , Nav.load url
            )
As it turns out, we don’t have to specify a message name when calling those functions. Nav.pushUrl will automatically send whatever message is assigned to the onUrlChange field in main once the URL has been changed in a browser address bar.
main : Program () Model Msg
main =
    Browser.application
        .
        .
        , onUrlChange = UrlChanged
        }
Note: We’ll handle the UrlChanged message below in the Navigation Scenario 3: When the Url is Changed section.
Nav.load, on the other hand, doesn’t send any messages back to our app. It creates a fire and forget command. We’ll see another example of such a command in the Sending Data to JavaScript section in chapter 8.
The following sequence diagram shows all the steps our app goes through when the user clicks an internal link.

And the following diagram illustrates what happens when an external link is clicked.

Navigation Scenario 3: When the URL is Changed
The final scenario we need to take care of is when the URL in a browser’s address bar is changed. As noted earlier, the command created by Nav.load doesn’t send a message back to our app after changing the URL. However, the command created by Nav.pushUrl does send the UrlChanged message back. Let’s add that message to the Msg type in Main.elm.
type Msg
    .
    .
    | LinkClicked UrlRequest
    | UrlChanged Url
Next we’ll handle UrlChanged in update. Add a new branch to the update function in Main.elm as shown below.
update : Msg -> Model -> ( Model, Cmd Msg )
update msg model =
    case ( msg, model.page ) of
        .
        .
        ( LinkClicked urlRequest, _ ) ->
            ...

        ( UrlChanged url, _ ) ->
            let
                newRoute =
                    Route.parseUrl url
            in
            ( { model | route = newRoute }, Cmd.none )
                |> initCurrentPage

        ( _, _ ) ->
            ...
All we need to do is extract a route from the new URL and determine which page to display. The latter is done inside the initCurrentPage function. Whenever the main model is changed, the Elm runtime will automatically call the view function in Main to get the view code for the new current page.
view : Model -> Html Msg
view model =
    case model.page of
        NotFoundPage ->
            notFoundView

        ListPage pageModel ->
            ListPosts.view pageModel
                |> Html.map ListPageMsg
The following sequence diagram shows various steps our app goes through when the URL is changed in a browser’s address bar as a result of user clicking an internal link.

HTML Document
The only thing remaining before we can test our app is changing the view function in Main.elm to return an HTML document instead of an element. The Browser.application function expects the view function to return a value of type Document msg as indicated by its type signature below.
Browser.application :
    { init : flags -> Url -> Key -> ( model, Cmd msg )
    , view : model -> Document msg
    , update : msg -> model -> ( model, Cmd msg )
    , subscriptions : model -> Sub msg
    , onUrlRequest : UrlRequest -> msg
    , onUrlChange : Url -> msg
    }
    -> Program flags model msg
The Document msg type is defined in the Browser module like this:
type alias Document msg =
    { title : String
    , body : List (Html msg)
    }
By returning a document, we’re now able to control the title of each page in our app if we want to. For simplicity, we’ll just use the same title for all pages. Let’s replace the view function in Main.elm with the following code.
view : Model -> Document Msg
view model =
    { title = "Post App"
    , body = [ currentView model ]
    }


currentView : Model -> Html Msg
currentView model =
    case model.page of
        NotFoundPage ->
            notFoundView

        ListPage pageModel ->
            ListPosts.view pageModel
                |> Html.map ListPageMsg
We also need to expose Document from Browser in Main.elm.
module Main exposing (main)

import Browser exposing (Document, UrlRequest)
.
.
Using elm-live
We’re now ready to test our app. Unfortunately elm reactor doesn’t know how to work with single-page apps, so if we try to load http://localhost:8000/posts we’ll get an error.

What we need is a different development server called elm-live. It knows how to route users to different parts of a single-page app. An added advantage of using elm-live is that it also reloads pages whenever the underlying code is modified. As a result, we don’t have to refresh a page to see new changes.
Install elm-live globally using the -g option by running the following command from beginning-elm directory in terminal.
$ npm install elm-live -gStop elm reactor by pressing Ctrl + c and run the following command from the beginning-elm directory in terminal.
$ elm-live post-app/Main.elm --pushstateThe --pushstate option is what allows elm-live to work with single-page apps. Don’t forget to run json-server from the beginning-elm directory in a separate terminal window if it’s not running already.
$ json-server --watch server/db.json -p 5019Now if you load either one of the following URLs, you should be routed to the list posts page.
Summary
In this section, we built a robust navigation infrastructure for our single-page app using the Browser.Navigation, Url, and Url.Parser modules. We can now properly route users to different parts of our app. It’s best practice to use paths instead of full URLs to determine which page the user should be taken to. We covered three navigation scenarios all single-page apps built in Elm must handle:
- When the application starts
- When the user clicks a link
- When the URL is changed
Along the way, we learned how to run single-page apps using elm-live. In the next section, we’ll build a separate page for editing a post.