The Elm runtime uses a package called elm/virtual-dom to render HTML on a screen. In this section, we’ll learn how this package works. First, let’s understand how browsers render HTML in general.
How Browsers Render HTML
When a browser is given some HTML code, it takes that code through a series of transformations before the UI elements are displayed on a screen.

1. Parse HTML
Let’s look at how the following HTML code we saw earlier in the Model View Update - Part 1 section gets rendered.
<html>
  <body>
    <div>
      <button> - </button>
      0
      <button> + </button>
    </div>
  </body>
</html>
The first thing a browser does when it encounters the above code is create HTML tokens. Tokens are the building blocks of a language. Collectively, they represent the entire vocabulary of that language. For example, the vocabulary of the English language consists of all the words that appear in a dictionary. Browsers use a process called tokenization or lexical analysis to break a chunk of HTML code into individual tokens. The figure below shows how the above code appears to a browser — a series of text characters.

To keep things simple, only a portion of the code is shown here. The first thing a browser does is step through the characters one at a time starting from the beginning.

The first character it encounters is <, which means what follows is a start tag token. The browser continues to process the next characters until it encounters >, which marks the end of a start tag token.

The series of characters between < and > are converted into the first start tag token called html.

The second token is the body start tag.


The browser continues to step through the characters in our code, converting them into more tokens. The figure below shows all the tokens present in our code.

2. Construct the DOM Tree
During the tokenization phase, the browser processed our code, which started as a stream of text characters, into a series of tokens. The next step is to create the Document Object Model (DOM) tree using these tokens.
- Document Object Model
- “The Document Object Model (DOM) is a programming interface for HTML and XML documents. It represents the page so that programs can change the document structure, style, and content. The DOM represents the document as nodes and objects. That way, programming languages can connect to the page.” - Mozilla Developer Network
After an HTML page is loaded, we often need to make changes to it based on various events generated either by the user or some other source. For example, when the user clicks the + button in the counter app we built earlier, we need to increment the count. To make this update easier, the browser creates the DOM tree for the page. A tree is a data structure that simulates the hierarchical relationship between objects.
With access to the object representation of each element in the HTML page, we can now add, change, and remove HTML elements and attributes; change the CSS styles; react to existing events; or create new events through JavaScript.
The DOM objects tend to have almost one-to-one mapping to the HTML markup as shown in the figure below.

The mapping is very close because the browser builds a DOM tree from tokens extracted from the original HTML code as shown below.

The objects in the DOM tree are often referred to as nodes in HTML parlance. We can be specific and call each node with a different name based on what type of object it represents. For example, the root node in the DOM tree is known as document. It is a special type of node that represents the entire HTML document. When the DOM tree creation process begins, the document node is the first one to be created. The browser then takes a sequence of tokens from the tokenization stage, creates respective DOM objects, and adds them to the tree as the document node’s children.

Nodes that can be used to specify an HTML tag are called elements. The element attributes such as id and class can be represented using the attribute nodes. Similarly, the comments and plain text can be represented using the comment and text nodes respectively. The official DOM specification contains many more types of nodes.
We can actually query the node type from a browser. Let’s try it. Open browser console from the counter app page located at http://localhost:8000/src/Counter.elm and enter the code after the > prompt below into the console.
- Opening browser console
- Instructions for opening the browser console depends on which browser you’re using. Please read this nice tutorial from WickedlySmart for learning how to open the console on various browsers.
> document.nodeType
9
The nodeType property returns a number. To find out which node type that number represents, we need to reference the following table.
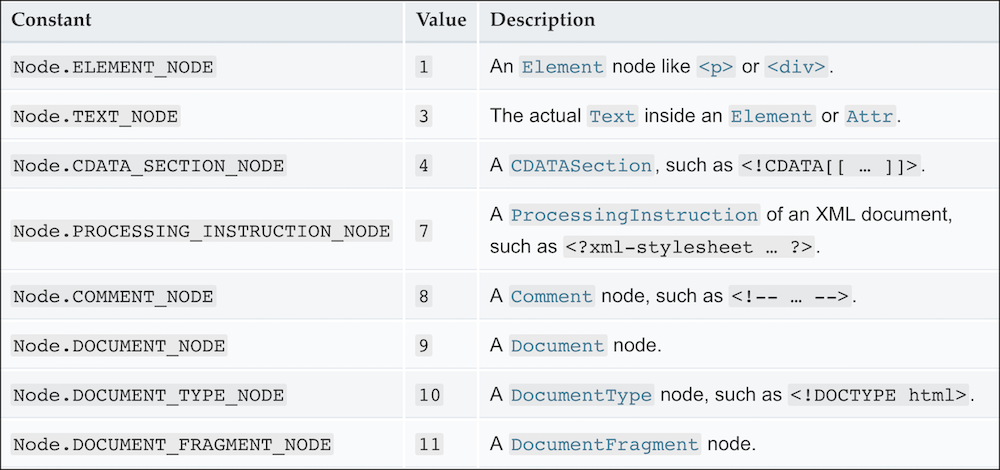
The number 9 means the DOCUMENT_NODE. Let’s query the node type of a few more DOM objects.
> var div = document.createElement("div")
undefined

> div.nodeType
1      // --> ELEMENT_NODE

> var text = document.createTextNode("some text")
undefined

> text.nodeType
3      // --> TEXT_NODE

> var comment = document.createComment("some comment")
undefined

> comment.nodeType
8      // --> COMMENT_NODE
Notice how we can create HTML elements using JavaScript functions such as createElement, createTextNode, and createComment. That’s possible due to the existence of the DOM tree. It turns the HTML code we typed into something we can manipulate using JavaScript in memory.
3. Construct the Render Tree
While the DOM tree is being created, the browser starts the rendering process in parallel by creating yet another tree called the render tree. The render tree contains the style information for each DOM node that dictates how the node should be displayed. Nodes that aren’t meant to be displayed on a screen aren’t included in the render tree. Here are a few examples of nodes that aren’t visible: head, script, and meta. Some nodes might be hidden via CSS through the use of display: none even though they can actually be displayed on a screen. These nodes are also excluded from the render tree.
4. Layout the Render Tree
With the render tree in place, the browser proceeds to lay out each node. The render tree contains the information that dictates how the nodes should be displayed, but not where on a screen they should be rendered. The browser computes the position and size of each node from the information stored in the render tree.
5. Paint the Render Tree on Screen
Now that all information required to render the nodes has been computed, the browser begins to convert each node in the render tree to actual pixels on the screen. This process is called painting.
The virtual DOM library in Elm only deals with the DOM tree, not the render tree, but by learning about both you have a complete picture of how an HTML page is rendered.
- Further Reading
- What we covered so far is a very high-level overview of how browsers parse and render HTML on a screen. If you’d like to learn more about this topic, here are some good resources:
Virtual DOM
Although the DOM tree makes it easy for us to create, update, and delete nodes, the direct manipulation of that tree tends to be really slow when we have large number of nodes. Let’s write some code in JavaScript to find out how long it takes to update a DOM node compared to a simple string. Create a new file called dom-performance-test.js in the beginning-elm directory and add the code below to it.

// Create a simple string
var someString = "some string";

// Update string 10,000 times
function updateString() {
    for (var i = 0; i <= 10000; i++) {
        someString = "updated string"
    };
}

// Find out how long it takes to update a string 10,000 times
var t1 = performance.now();
updateString();
var t2 = performance.now();

console.log("It took " + (t2 - t1) + " milliseconds to update a string.");
We created a simple string and wrote a function to update that string 10,000 times. We then used the performance.now function to capture the timestamp right before and after applying updateString. Finally, we printed how long it took for the updateString function to execute in the console.
Next, we’ll write a similar test to find out how long it takes to update a DOM node. Add the following code to the bottom of dom-performance-test.js.
// Create new nodes
var newDiv = document.createElement("div");
var newText = document.createTextNode("some text");

// Add new nodes to the DOM tree
newDiv.appendChild(newText);
document.body.appendChild(newDiv);

// Update the text node inside div 10,000 times
function updateDOM() {
    for (var i = 0; i <= 10000; i++) {
        newDiv.innerHTML = "updated text";
    }
}

// Find out how long it takes to update a DOM element
var t3 = performance.now();
updateDOM();
var t4 = performance.now();

console.log("It took " + (t4 - t3) + " milliseconds to update a DOM element.");
We created a new div element and added a text node to it. After that, we appended the div as a child to the body element. The updateDOM function simply updates the HTML content inside the div element 10,000 times by assigning a new value to the innerHtml property.
To run this experiment, we need to load dom-performance-test.js from the index.html file located in the beginning-elm directory.
<!DOCTYPE html>
<html>
  .
  .
  <body>
    .
    .
    <script src="experiment.js"></script>
    <script src="dom-performance-test.js"></script>
    .
    .
  </body>
</html>
Open index.html in a browser and then go to the browser console. You should see the number of milliseconds it took to update a string and a DOM element.
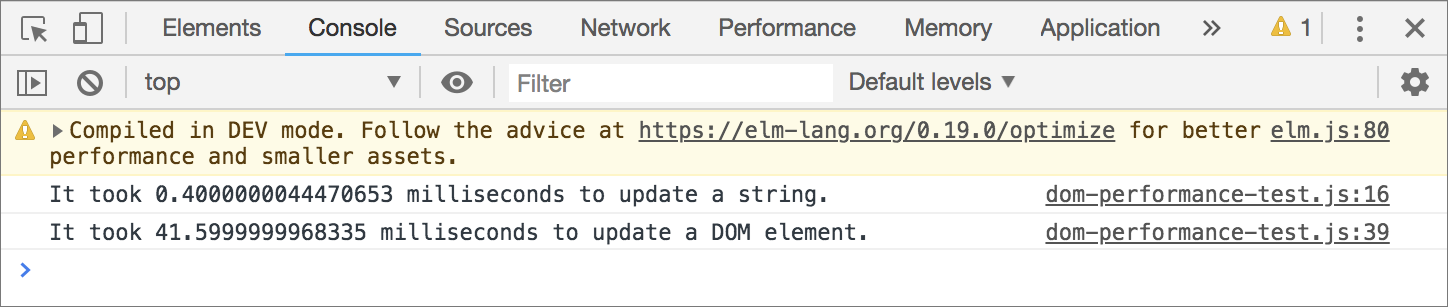
Those numbers are from Chrome 70 on a MacBook Pro with 2.2 GHz Intel Core i7 processor and 16 GB of memory. You might see different results depending on which browser and computer you run the experiment on. No matter which configuration you use, you’ll notice that it takes significantly longer to update a DOM element compared to a string. Why is that?
Updating a string is quite straightforward. JavaScript knows where the string is stored in memory, so it takes the new value and simply overwrites the bits in memory. But when we update a DOM node, it’s not just JavaScript that’s doing the work. The browser needs to take the new change through the entire process we laid out earlier:
- Parse HTML
- Update the DOM tree
- Update the render tree
- Layout the render tree
- Paint the render tree on screen
Depending on how complex the change is, the browser may need to destroy and re-create the existing children nodes of the element we’re trying to update. It may also need to recompute the physical dimensions and style of many nodes that are affected by the change. If there are any browser extensions that control access to the node we want to modify, the browser will have to first ask for their permission and notify them after the change has been made.
The full implications of updating a DOM node could be huge. The update we’re trying to make above wasn’t even that complex and it took about 104 times longer than updating a string. We can only imagine how much longer it will take when we need to update many nodes at once.
Although we can’t fully sidestep this problem, Elm mitigates it by making as few updates as possible to the DOM tree. Elm actually takes over the entire responsibility for updating the DOM tree from us. Earlier when we wrote this code in JavaScript:
// Update the text node inside div 10,000 times
function updateDOM() {
    for (var i = 0; i <= 10000; i++) {
        newDiv.innerHTML = "updated text";
    }
}
We were getting into the dirty details of updating the DOM by ourselves. In Elm, all we need to do is specify how we want to present our model to the user and let the runtime take care of updating the DOM. In the Model View Update - Part 1 section, we wrote the following code to display our view.
view : Model -> Html Msg
view model =
    div []
        [ button [ onClick Decrement ] [ text "-" ]
        , text (String.fromInt model)
        , button [ onClick Increment ] [ text "+" ]
        ]
We didn’t have to specify which DOM nodes should be updated. All we did was declare what our view should look like by using simple Elm functions. Behind the scenes, Elm used the elm/virtual-dom package to convert the code in view to actual DOM nodes.

Understanding How elm/virtual-dom Works
Let’s dig a little deeper into the elm/virtual-dom package to understand how it works. Most functions defined in the Html module are wrappers for virtual DOM nodes. Take a look at how the div function is implemented in the Html module.
div : List (Attribute msg) -> List (Html msg) -> Html msg
div =
    Elm.Kernel.VirtualDom.node "div"
All it does is pass a tag name to another function called node defined in the Elm.Kernel.VirtualDom. Here are a couple more examples:
button : List (Attribute msg) -> List (Html msg) -> Html msg
button =
    Elm.Kernel.VirtualDom.node "button"
label : List (Attribute msg) -> List (Html msg) -> Html msg
label =
Elm.Kernel.VirtualDom.node "label"The Elm.Kernel prefix indicates this module is not written in Elm. Kernel modules are generally written in JavaScript, but they can also be written in some other language (e.g., CoffeeScript) that eventually compiles to JavaScript. And someday they might be rewritten in WebAssembly too.
A good number of Elm modules are partially implemented in JavaScript behind the scenes. For example, the List.sortWith function we went over in the Sorting a List section is implemented like this:
sortWith : (a -> a -> Order) ->  List a -> List a
sortWith =
    Elm.Kernel.List.sortWith
Elm.Kernel.List.sortWith is in turn implemented in JavaScript like this:
var _List_sortWith = F2(function(f, xs) {
    return _List_fromArray(_List_toArray(xs).sort(function(a, b) {
        var ord = A2(f, a, b);
        return ord === __Basics_EQ ? 0 : ord === __Basics_LT ? -1 : 1;
    }));
});
Similarly, the String.filter function we covered in the Filtering a String section also uses a kernel module behind the scenes.
filter : (Char -> Bool) -> String -> String
filter =
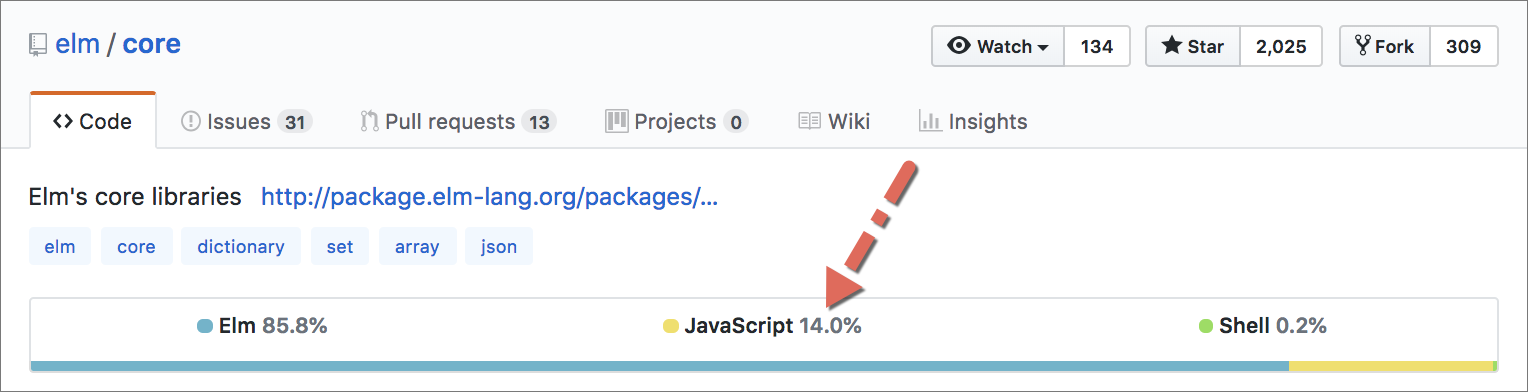
Elm.Kernel.String.filterAs of this writing, 14% of the entire elm/core package, which includes standard library modules such as List and String, is implemented in JavaScript.
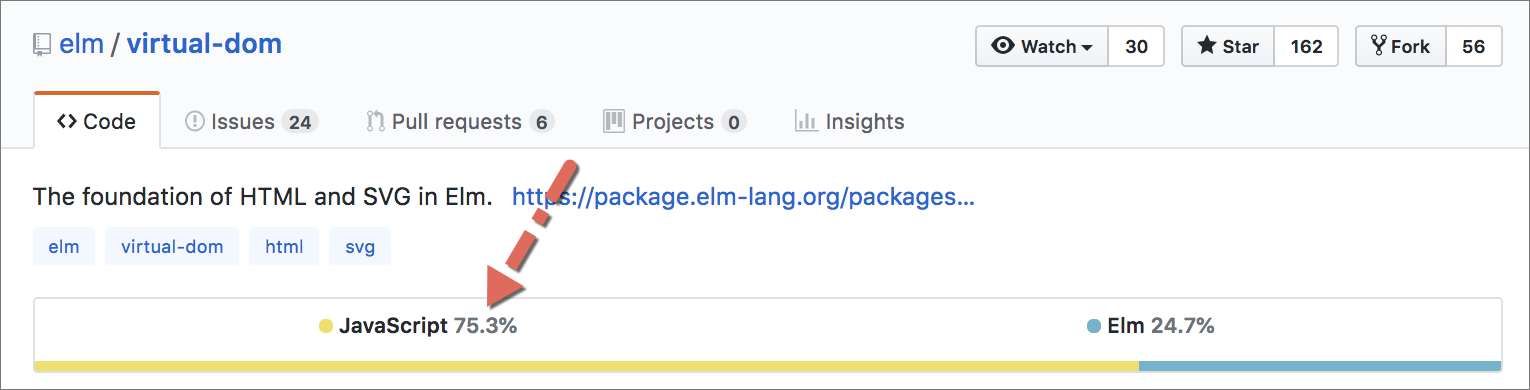
Similarly, 75% of the elm/virtual-dom package is implemented in JavaScript.
- Elm Kernel
- In the context of an operating system, the kernel is a program that handles lower-level tasks such as managing memory and interfacing with peripherals like keyboards, monitors, and speakers. Higher-level programs aren’t allowed to communicate with those peripherals directly. They have to make a system call to the kernel to get access.
-
Elm uses a similar approach to manage lower-level web systems such as DOM, mouse, keyboard, and geolocation. To access those systems, our applications must go through the Elm Kernel. When the
Html.divfunction usednodefromElm.Kernel.VirtualDompackage earlier, it actually made a system call to the Elm Kernel to create an HTML node. Luckily for us, most of these lower-level system calls are hidden behind easy-to-use modules such asHtml,List, andString. Therefore, we rarely need to call them directly. -
One of the biggest benefits of restricting direct access to the lower-level systems is reliability. If Elm Kernel didn’t exist, we would be forced to use JavaScript to interact with those systems. In the Pure Functions section, we learned how unreliable the JavaScript code can be due to its impurity. By going through the Elm Kernel, our application code is in a position to take advantage of the “if it compiles, it works” guarantee that comes with using Elm functions.
-
Not only Elm doesn’t allow our application code to directly access the lower-level web systems, but it also prevents our code from calling the kernel. Third-party packages are also not allowed to access the kernel. Only official packages published by the
elmandelm-explorationsorganizations can access the kernel. Without this restriction, it would be difficult to provide the “if it compiles, it works” guarantee. -
The Elm Kernel offers many more benefits. To find out what they are, I recommend reading this wonderful post about the history of Elm Kernel by Evan Czaplicki — the creator of Elm.
Inner Workings of the Virtual Dom
Now that we know what kernel modules are, let’s get back to understanding how Elm.Kernel.VirtualDom works. The node function in that module is implemented like this in JavaScript:
var _VirtualDom_nodeNS = F2(function(namespace, tag) {
    return F2(function(factList, kidList) {
        for (var kids = [], descendantsCount = 0; kidList.b; kidList = kidList.b) {
            var kid = kidList.a;
            descendantsCount += (kid.__descendantsCount || 0);
            kids.push(kid);
        }

        descendantsCount += kids.length;

        return {
            $: __2_NODE,
            __tag: tag,
            __facts: _VirtualDom_organizeFacts(factList),
            __kids: kids,
            __namespace: namespace,
            __descendantsCount: descendantsCount
        };
    });
});
Most code in Elm.Kernel.VirtualDom including the one above is highly complex. We aren’t equipped to understand that code without extensive knowledge of JavaScript and the inner workings of virtual DOM. We’ll just settle for a high-level overview of how Elm.Kernel.VirtualDom works. The following algorithm roughly outlines the process used by this module.
- Algorithm for Rendering HTML Elements in Elm
- Step 1: Create a virtual DOM tree. This is not an exact replica of the real DOM tree. It’s just a light-weight version built using JavaScript objects.
-
Step 2: Make a UI change in our app. This change could be anything, for example changing the color of a button, or adding a completely new UI element, or removing an existing one.
-
Step 3: Create a new virtual DOM tree that reflects the UI changes we made. This tree is different from the one created in step 1.
-
Step 4: Figure out the exact differences between the new and previous virtual DOM trees. This step is where the virtual DOM really shines. If we were to compute the difference between the new and previous UI using the real DOM, we would take a huge performance hit. In contrast, the virtual DOM is highly optimized for operations like these.
-
Step 5: Repeat step 2 through step 4 until all UI changes have been identified.
-
Step 6: Create instructions for modifying the real DOM tree in one big batch. As mentioned earlier, even a seemingly small change to the real DOM tree is expensive from performance standpoint. So it’s prudent to combine multiple instructions together rather than applying each change individually.
-
Step 7: Modify the real DOM tree using the
requestAnimationFramefunction, which figures out the best way to apply multiple changes so that the transition from the previous UI to the new one is smooth.
Although we dug deep into the elm/virtual-dom package in this section, the good news is we don’t really have to understand how it works at all to be able to build great apps in Elm. The Html module abstracts all this dirty detail away and lets us use simple functions like div, button, and label that map directly to the HTML tags.
- A Brief History of the Virtual DOM
- The concept of a virtual DOM was popularized by React — a JavaScript library for building user interfaces — back in 2013. At the time, the virtual DOM implementation was buried deep into React, so other languages and frameworks couldn’t take advantage of this great concept.
-
Jake Verbaten realized that it’s possible to implement a virtual DOM on its own as a set of independent modules and wrote a nice article that laid out what that implementation would look like. In early 2014, Matt Esch started working on creating a standalone virtual DOM library.
-
Soon after the standalone virtual DOM library was available, Evan Czaplicki — the creator of Elm — used it as an underlying implementation for the
Elm.Kernel.VirtualDommodule. In May of 2016, a new version (0.17) of Elm was released and Evan had to rewrite the entire virtual DOM implementation from scratch to support the API changes made in 0.17. The new implementation is much faster than the versions used before 0.17 and it continues to improve with each new release.
Benefits of Using the Virtual DOM
From what we have learned so far, it appears that the reason virtual DOM exists is to mitigate the performance bottlenecks caused by manipulating the DOM tree too often. There is also a second benefit that is more relevant to our day-to-day experience with Elm — it allows us to write modular view code using pure functions. The rest of this section is dedicated to exploring these two benefits.
Writing Modular View Code
Let’s look at the view function we wrote in Elm earlier once again.
view : Model -> Html Msg
view model =
    div []
        [ button [ onClick Decrement ] [ text "-" ]
        , text (String.fromInt model)
        , button [ onClick Increment ] [ text "+" ]
        ]
The beautiful thing about this function is that it will always return the exact same HTML given the same input. That means we can reliably verify that the view function behaves as expected with simple tests. We can also break it into multiple equally reliable functions if it starts to get more complex. Let’s imagine an app whose home page looks like this:
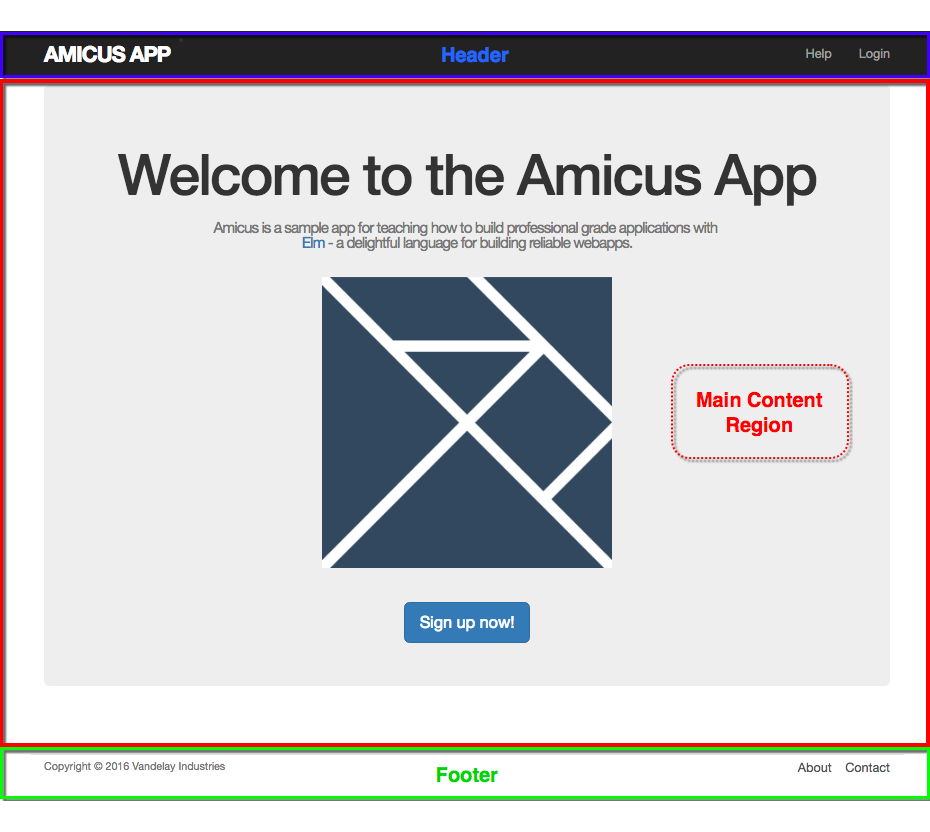
The home page is divided into three distinct regions: navigation header, main content region, and footer. The view code for this page will certainly be a lot more complex than the above view function, but we can break it into multiple functions so that it doesn’t get too overwhelming. Here’s how a hypothetical view function for that home page would look:
view : Model -> Html Msg
view model =
    div []
        [ nav model
        , mainContent model
        , footer model
        ]


nav : Model -> Html Msg
nav model =
    header [ class "navbar navbar-fixed-top navbar-inverse" ]
        [ div [ class "container" ]
            [ div [ class "navbar-header" ]
                [ button
                    [ class "navbar-toggle"
                    , attribute "data-target" "#myNavBar"
                    , attribute "data-toggle" "collapse"
                    ]
                    [ span [ class "icon-bar" ] []
                    , span [ class "icon-bar" ] []
                    , span [ class "icon-bar" ] []
                    ]
                , li []
                    [ a [ href "#home", id "logo" ]
                        [ text "amicus app" ]
                    ]
                ]
            , Html.nav [ class "collapse navbar-collapse", id "myNavBar" ]
                [ ul [ class "nav navbar-nav navbar-right" ]
                    [ li []
                        [ a [ href "#help" ]
                            [ text "Help" ]
                        ]
                    , li []
                        [ a [ href "#login" ]
                            [ text "Login" ]
                        ]
                    ]
                ]
            ]
        ]


mainContent : Model -> Html Msg
mainContent model =
    case model.route of
        HomeRoute ->
            StaticPages.HomeView.view ()

        AboutRoute ->
            StaticPages.AboutView.view ()

        ContactRoute ->
            StaticPages.ContactView.view ()

        HelpRoute ->
            StaticPages.HelpView.view ()

        SignupRoute ->
            App.map SignupMsg (Signup.View.view model.currentUser)

        ProfileRoute ->
            App.map ProfileMsg (Profile.View.view model.currentUser)

        LoginRoute ->
            App.map LoginMsg (Login.View.view model.currentUser)

        NotFoundRoute ->
            notFoundView


notFoundView : Html Msg
notFoundView =
    div [] [ text "Not found" ]


footer : Model -> Html Msg
footer model =
    Html.footer [ class "container" ]
        [ small [] [ text "Copyright © 2016 Vandelay Industries" ]
        , Html.nav []
            [ ul []
                [ li []
                    [ a [ href "#about" ]
                        [ text "About" ]
                    ]
                , li []
                    [ a [ href "#contact" ]
                        [ text "Contact" ]
                    ]
                ]
            ]
        ]
Don’t worry about understanding how each function in the above code listing works. Just focus on the overall structure of the code. Instead of producing all HTML code by itself, the view function now delegates that task to the nav, mainContent, and footer functions which are responsible for producing HTML for each individual section of the page.
By splitting the view code like this, we’ve reduced the cognitive overload quite a bit. We can zoom in on one specific part of the page by locating the respective function and just understand how that code works. This is one of the reasons why Elm is a fantastic tool for building highly interactive web apps that will continue to grow in size and complexity over time.
In most languages and frameworks, it’s not so straightforward to write modular view functions like in Elm. That’s because not only do those languages lack inherent support for pure functions, but the view code also often wants to manipulate the real DOM directly.

Whereas in Elm, the view code is isolated from real DOM by the runtime.

Performance Benefits
Since the Elm runtime abstracts away the dirty details of manipulating the real DOM, it has more freedom to make clever optimizations behind the scenes resulting in much faster rendering of pages. But, how fast can Elm render pages exactly? The chart below shows how Elm fares against some of the most popular front-end frameworks in use today.

The above graph shows that Elm is extremely fast when it comes to rendering pages. If you are interested in learning what optimizations Elm uses to achieve such great performance, you should definitely read this wonderful blog post by Evan.
Summary
In this section, we learned how modern browsers render HTML by first parsing a stream of characters into HTML tokens and building the DOM tree using those tokens. The DOM tree is then converted into the render tree, which goes through a layout process, before finally being painted on a screen.
We also learned that manipulating the DOM tree directly is quite slow. This led to the development of virtual DOM which enabled the Elm runtime to significantly speed up the rendering process. The virtual DOM has also enabled us to write modular view code using pure Elm functions that are easy to test and maintain in the long run.