In Model View Update - Part 1, we used a very simple example to learn the fundamental concepts behind Elm Architecture. In this section, we’ll build a slightly more complex app to reinforce our understanding of the Model View Update pattern.
Building a Sign-Up Form
Most web applications today require users to create a new account, so let’s build a sign-up form in Elm. It will be a good exercise to see how the Elm Architecture holds up when our application isn’t just a simple counter. It’ll also give us an opportunity to learn how to style our app using different techniques including an external CSS framework. Here’s how the sign-up form will look after we’re done implementing it.

When building a new app, we often don’t know where to start. One approach is to define the model first, write some view code to present that model to the user, and figure out what messages the user can send to our app. We can then use those messages to transform the current model into a new one. This is exactly the approach we took in the Model View Update - Part 1 section when we built a simple counter app. We’ll use the same approach here too.
Model
First, let’s think about what information does our app need to keep track of. To create a new account, we need the user’s name, email, and password. We also need to keep track of whether or not the user is logged in. Based on that, here is what the model looks like:
module Signup exposing (User)


type alias User =
    { name : String
    , email : String
    , password : String
    , loggedIn : Bool
    }
Create a new file called Signup.elm in the beginning-elm/src directory and add the above code to it.

Our model is a record with four fields. The user entered information will be stored in name, email, and password. loggedIn will indicate whether or not the user has been authenticated to use the app. It’s quite common to use a record for defining a model in Elm as we’ve done here.
We called our model User. Elm doesn’t require us to use the word Model, so we can give it whatever name we want. It makes sense to call our model User since we’re using it to track information about the user. The model for our sign-up app is more complex compared to the counter app. Here’s the counter app model again for comparison:
type alias Model
    = Int
Now that we’ve defined the structure of our model, we need to create an initial version of it. The initial model will be given to the app when it gets launched. Add the following code to the bottom of Signup.elm.
initialModel : User
initialModel =
    { name = ""
    , email = ""
    , password = ""
    , loggedIn = False
    }
View
The next step is to present the initial model to the user. We do that by passing the model to the view function. Add the following code to the bottom of Signup.elm.
view : User -> Html msg
view user =
    div []
        [ h1 [] [ text "Sign up" ]
        , Html.form []
            [ div []
                [ text "Name"
                , input [ id "name", type_ "text" ] []
                ]
            , div []
                [ text "Email"
                , input [ id "email", type_ "email" ] []
                ]
            , div []
                [ text "Password"
                , input [ id "password", type_ "password" ] []
                ]
            , div []
                [ button [ type_ "submit" ]
                    [ text "Create my account" ]
                ]
            ]
        ]
We already know what the div, text, and button functions do. The new functions — h1, form, and input — represent the <h1>, <form>, and <input> HTML tags respectively. The id function represents the id attribute of an HTML tag. Finally, the type_ function defines which type of button we want to use. We can also use type_ to specify the type for other tags such as <input>, <script>, and <style>.
Notice the underscore in the type_ function’s name. That’s because the type keyword is already taken in Elm. Earlier in the Naming Constants section, it was suggested that we should try to replace an underscore with a meaningful word like this:
> name = "Sansa"
"Sansa"

> name_ = "Stark"    -- Valid but not recommended
"Stark"
> firstName = "Sansa"
"Sansa"
> lastName = "Stark" -- Much better
"Stark"Following that suggestion, the creators of the Html module could have renamed the type_ function to buttonType, but then they’d have to create separate functions for specifying the type attribute of other tags too such as <input>, <script>, and <style>. That seems a bit superfluous, so the use of an underscore is justified in this case.
All of the functions used in view are defined in the Html and Html.Attributes modules, so go ahead and import them in Signup.elm.
module Signup exposing (User)
import Html exposing (..)
import Html.Attributes exposing (..)
.
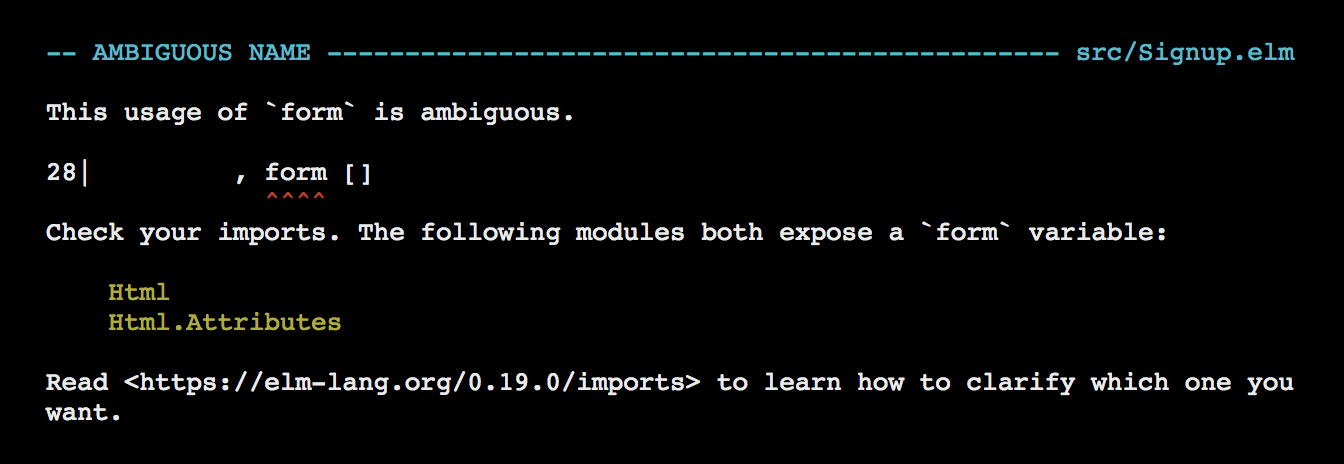
.Notice how we had to use the Html prefix before form in the view function — Html.form. That’s because we exposed everything from the Html and Html.Attributes modules and both of them define a function called form. If we hadn’t added the prefix, the Elm would get confused and show us the following error.
Generally speaking, we should avoid exposing everything from a module due to reasons explained in the Qualified vs Unqualified Import section. However, if we have a family of modules that often get used together such as Html and Html.Attributes where the chances of name clashes are minimal and the function names are self-documenting then it’s safe to expose everything. If you don’t feel comfortable exposing everything at all, an alternative is to expose each value individually like this:
module Signup exposing (User)

import Html exposing (Html, button, div, form, h1, input, text)
import Html.Attributes exposing (id, type_)
.
.
Application Entry Point
To display the view, we need to define an entry point to our app. Add the following code to the bottom of Signup.elm.
main : Html msg
main =
    view initialModel
Run elm reactor from the beginning-elm directory in terminal if it’s not running already, and go to this URL in your browser: http://localhost:8000/src/Signup.elm. You should see the sign-up form.

Styling Our View
Our sign-up form looks a bit ugly. Let’s add some style. There are multiple ways to style a page in Elm:
- Using inline styles
- Using the
elm-csspackage - Using an external CSS file
- Using a CSS framework
We’ll use all of those approaches to style the sign-up form. That way you’ll have a better sense of which one feels more comfortable and maintainable to you.
1. Using Inline Styles
We can use the style function from the Html.Attributes module to add an inline style. Let’s add some padding to the header. In the view function, modify the line that applies the h1 function like this:
view : User -> Html msg
view user =
    div []
        [ h1 [ style "padding-left" "3cm" ] [ text "Sign up" ]
        , Html.form []
        .
        .
The style function takes two arguments: CSS property name and value. Here’s how its type signature looks:
style : String -> String -> Attribute msgNext, we’ll style the form, input, and button tags. Add the following code below the view function.
formStyle : List (Attribute msg)
formStyle =
    [ style "border-radius" "5px"
    , style "background-color" "#f2f2f2"
    , style "padding" "20px"
    , style "width" "300px"
    ]


inputStyle : List (Attribute msg)
inputStyle =
    [ style "display" "block"
    , style "width" "260px"
    , style "padding" "12px 20px"
    , style "margin" "8px 0"
    , style "border" "none"
    , style "border-radius" "4px"
    ]


buttonStyle : List (Attribute msg)
buttonStyle =
    [ style "width" "300px"
    , style "background-color" "#397cd5"
    , style "color" "white"
    , style "padding" "14px 20px"
    , style "margin-top" "10px"
    , style "border" "none"
    , style "border-radius" "4px"
    , style "font-size" "16px"
    ]
Apply these styles to the respective tags in the view function.
view : User -> Html msg
view user =
    div []
        [ h1 [ style "padding-left" "3cm" ] [ text "Sign up" ]
        , Html.form formStyle
            [ div []
                [ text "Name"
                , input ([ id "name", type_ "text" ] ++ inputStyle) []
                ]
            , div []
                [ text "Email"
                , input ([ id "email", type_ "email" ] ++ inputStyle) []
                ]
            , div []
                [ text "Password"
                , input ([ id "password", type_ "password" ] ++ inputStyle) []
                ]
            , div []
                [ button ([ type_ "submit" ] ++ buttonStyle)
                    [ text "Create my account" ]
                ]
            ]
        ]
Refresh the page at http://localhost:8000/src/Signup.elm and you should see a much better looking sign-up form.
Note: The best practice for working with HTML suggests that the styles should primarily be specified in CSS files. Therefore, we shouldn’t use too many inline styles.
2. Using the elm-css Package
It’s convenient to style elements inline. However, if we make a mistake typing one of the properties, the Elm compiler won’t catch it because they’re just plain old strings. Wouldn’t it be great if we could use Elm’s type system to detect errors in our CSS too? That’s exactly what the elm-css package offers.
Let’s re-implement the styles we applied above using functions defined in the Css module included in the elm-css package. Before we can do that though, we need to install the package. Run the following command from the beginning-elm directory in terminal.
$ elm install rtfeldman/elm-cssAnswer y when asked to add rtfeldman/elm-css and other packages to elm.json file. elm-css is a complex package with more than a dozen modules in it, but we’re interested in only three of them:
CssHtml.StyledHtml.Styled.Attributes
Css Module
The Css module enables us to apply CSS styles using plain old Elm functions. For example, if we want to give a blue background to a button, we can use the backgroundColor and hex functions defined in the Css module like this:
backgroundColor (hex "#397cd5")For comparison, here is how we used the style function earlier to do exactly that:
style "background-color" "#397cd5"If we make a mistake while typing a function name from the CSS module, the Elm compiler will throw an error. However, if we introduce a typo in the CSS property name passed to the style function, the compiler can’t help us. By taking advantange of Elm’s powerful type system, we can get rid of so many CSS related bugs during compile time. Isn’t that nice? Let’s import the Css module in Signup.elm.
module Signup exposing (User)

import Css exposing (..)
.
.
Html.Styled Module
Html.Styled is a drop-in replacement for the Html module from the elm/html package. All it does is return a styled version of elements defined in the Html module. For example, here is how the Html.text function is implemented.
text : String -> Html msg
text =
    VirtualDom.text
Remember all HTML elements in Elm are virtual DOM nodes behind the scenes. Let’s compare the implementation above with that of Html.Styled.text.
text : String -> Html msg
text =
    VirtualDom.Styled.text
As you can see, the only difference is that Html.Styled.text returns a styled node whereas Html.text returns a plain old node. Let’s import Html.Styled in Signup.elm and remove the line that imports the Html module.
module Signup exposing (User)

import Html.Styled exposing (..)
.
.
We can now create styled elements in our app like this:
styledForm : List (Attribute msg) -> List (Html msg) -> Html msg
styledForm =
    styled Html.Styled.form
        [ borderRadius (px 5)
        , backgroundColor (hex "#f2f2f2")
        , padding (px 20)
        , Css.width (px 300)
        ]


styledInput : List (Attribute msg) -> List (Html msg) -> Html msg
styledInput =
    styled Html.Styled.input
        [ display block
        , Css.width (px 260)
        , padding2 (px 12) (px 20)
        , margin2 (px 8) (px 0)
        , border (px 0)
        , borderRadius (px 4)
        ]


styledButton : List (Attribute msg) -> List (Html msg) -> Html msg
styledButton =
    styled Html.Styled.button
        [ Css.width (px 300)
        , backgroundColor (hex "#397cd5")
        , color (hex "#fff")
        , padding2 (px 14) (px 20)
        , marginTop (px 10)
        , border (px 0)
        , borderRadius (px 4)
        , fontSize (px 16)
        ]
Add that code below view in Signup.elm and also remove the formStyle, inputStyle, and buttonStyle functions while we’re at it. To style an element using elm-css, we need to use the styled function defined in the Html.Styled module. Here is how its type signature looks:
styled :
    (List (Attribute a) -> List (Html b) -> Html msg)
    -> List Style
    -> List (Attribute a)
    -> List (Html b)
    -> Html msg
The first argument is an HTML element from the Html.Styled module. We can’t use the one defined in Html. The second argument is a list of CSS styles. Each style is represented by the Style type defined in the Css module we covered earlier. Now that we have styled the form, input, and button elements separately, let’s use them in our view function.
view : User -> Html msg
view user =
    div []
        [ h1 [ style "padding-left" "3cm" ] [ text "Sign up" ]
        , styledForm []
            [ div []
                [ text "Name"
                , styledInput [ id "name", type_ "text" ] []
                ]
            , div []
                [ text "Email"
                , styledInput [ id "email", type_ "email" ] []
                ]
            , div []
                [ text "Password"
                , styledInput [ id "password", type_ "password" ] []
                ]
            , div []
                [ styledButton [ type_ "submit" ]
                    [ text "Create my account" ]
                ]
            ]
        ]
Html.Styled.Attributes Module
To style the header, we’ll use the css function from the Html.Styled.Attributes module like this:
view : User -> Html msg
view user =
    div []
        [ h1 [ css [ paddingLeft (cm 3) ] ] [ text "Sign up" ]
        .
        .
We’re still inlining our style here, but we’re using an Elm function to specify the padding-left CSS property. Here’s how the css function’s type signature looks:
css : List Style -> Html.Styled.Attribute msgHtml.Styled.Attributes is a drop-in replacement for the Html.Attributes module from the elm/html package. Let’s import it in Signup.elm and remove the line that imports Html.Attributes.
module Signup exposing (User)

import Html.Styled.Attributes exposing (..)
.
.
The id and type_ attributes used inside the view function are now from Html.Styled.Attributes instead of Html.Attributes.
Rendering Styled Elements
All of our HTML elements and their attributes now come from the Html.Styled and Html.Styled.Attributes modules respectively. Elm doesn’t know how to render them. Luckily, the Html.Styled module provides a function called toUnstyled for converting the styled elements to something Elm can render. Here is how its type signature looks:
toUnstyled : Html msg -> Virtual.Node msgModify main in Signup.elm to this:
main : VirtualDom.Node msg
main =
toUnstyled <| view initialModelmain’s type is now VirtualDom.Node msg. Before using elm-css it was Html msg. The definition of the Html type reveals that it’s just a type alias for VirtualDom.Node.
type alias Html msg =
    VirtualDom.Node msg
Because of this, we are allowed to return a virtual DOM node directly from main. Let’s install the elm/virtual-dom package by running the following command from the beginning-elm directory.
$ elm install elm/virtual-domActually, that package is already installed as an indirect dependency. Answer y to make it a direct dependency. Now import the VirtualDom module in Signup.elm.
module Signup exposing (User)

import VirtualDom
.
.
Finally, we’re ready to run our app. Refresh the page at http://localhost:8000/src/Signup.elm and you should see the exact same form as before.
3. Using an External CSS File
The third option is to create a regular CSS file and use it in our Elm app. Unfortunately, elm reactor doesn’t provide an easy way to load external CSS files, so we’ll have to compile the Signup.elm file manually. Create a new file called signup-style.css in the beginning-elm directory and add the code below to it.

h1 {
    padding-left: 3cm;
}

form {
    border-radius: 5px;
    background-color: #f2f2f2;
    padding: 20px;
    width: 300px;
}

input {
    display: block;
    width: 260px;
    padding: 12px 20px;
    margin: 8px 0;
    border: none;
    border-radius: 4px;
}

button {
    width: 300px;
    background-color: #397cd5;
    color: white;
    padding: 14px 20px;
    margin-top: 10px;
    border: none;
    border-radius: 4px;
    font-size: 16px;
}
Next, we’ll use elm make to compile the Signup.elm file. Before we do that, we need to remove all traces of elm-css from that file. Remove the styledForm, styledInput, and styledButton functions and modify view to this:
view : User -> Html msg
view user =
    div []
        [ h1 [] [ text "Sign up" ]
        , Html.form []
            [ div []
                [ text "Name"
                , input [ id "name", type_ "text" ] []
                ]
            , div []
                [ text "Email"
                , input [ id "email", type_ "email" ] []
                ]
            , div []
                [ text "Password"
                , input [ id "password", type_ "password" ] []
                ]
            , div []
                [ button [ type_ "submit" ]
                    [ text "Create my account" ]
                ]
            ]
        ]
We’re back to where our sign-up form had no style at all. Remove toUnstyled from main and also change its type signature.
main : Html msg
main =
    view initialModel
And replace the import list in Signup.elm with the following.
module Signup exposing (User)

import Html exposing (..)
import Html.Attributes exposing (..)
.
.
We’re now ready to compile Signup.elm to JavaScript. Run the following command from the beginning-elm directory in terminal.
$ elm make src/Signup.elm --output signup.jselm make will create a new file called signup.js in the beginning-elm directory. If it already exists, its contents will be overwritten. The final step is to create an HTML file that loads the signup-style.css and signup.js files. Create a new file called signup.html in the beginning-elm directory and add the code below to it.

<!DOCTYPE html>
<html>
  <head>
    <link rel="stylesheet" href="signup-style.css">
  </head>

  <body>
    <div id="elm-app-is-loaded-here"></div>
    <script src="signup.js"></script>
    <script>
      var app = Elm.Signup.init({
        node: document.getElementById("elm-app-is-loaded-here")
      });
    </script>
  </body>
</html>
The code for loading the signup-style.css file is straightforward, but the one that loads our Elm app is slightly more complex. First, we need to load the signup.js file, which contains the compiled JavaScript code. Remember, the signup.js file includes not only the code we wrote, but also the entire Elm runtime and all the other Elm packages we installed.

We created a div and gave it an id. We then asked the Elm runtime to load our app inside the elm-code-is-loaded-here div. When we call the Elm.Signup.init function, the runtime looks for the main function inside the Signup module and uses it as an entry point. If the Signup module is missing, or if the Signup module exists, but doesn’t have the main function, we’ll get an error. If you open the beginning-elm/signup.html file in a browser, you should see the exact same form as before.
Loading CSS from an external file forced us to take a few more steps, but it also enabled us to use any CSS file in our Elm app. This approach will come in handy if you are planning to introduce Elm into your existing app that already contains numerous CSS files.
4. Using a CSS Framework
It’s also possible to use a CSS framework with Elm apps. It’s actually very similar to using an external CSS file. Back in the Building a Simple Page with Elm section, we used the popular Bootstrap framework to style the home page of Dunder Mifflin. Let’s use it here again to style our sign-up form. Modify the signup.html file to include the Bootstrap framework instead of the signup-style.css file.
<!DOCTYPE html>
<html>
  <head>
    <link rel="stylesheet"
          href="https://maxcdn.bootstrapcdn.com/bootstrap/3.3.7/css/bootstrap.min.css">
  </head>

  <body>
    <div id="elm-app-is-loaded-here"></div>
    <script src="signup.js"></script>
    <script>
      var app = Elm.Signup.init({
        node: document.getElementById("elm-app-is-loaded-here")
      });
    </script>
  </body>
</html>
Next, we need to specify which CSS classes we want to use in our Elm code. Modify the view function in Signup.elm like this:
view : User -> Html msg
view user =
    div [ class "container" ]
        [ div [ class "row" ]
            [ div [ class "col-md-6 col-md-offset-3" ]
                [ h1 [ class "text-center" ] [ text "Sign up" ]
                , Html.form []
                    [ div [ class "form-group" ]
                        [ label
                            [ class "control-label"
                            , for "name"
                            ]
                            [ text "Name" ]
                        , input
                            [ class "form-control"
                            , id "name"
                            , type_ "text"
                            ]
                            []
                        ]
                    , div [ class "form-group" ]
                        [ label
                            [ class "control-label"
                            , for "email"
                            ]
                            [ text "Email" ]
                        , input
                            [ class "form-control"
                            , id "email"
                            , type_ "email"
                            ]
                            []
                        ]
                    , div [ class "form-group" ]
                        [ label
                            [ class "control-label"
                            , for "password"
                            ]
                            [ text "Password" ]
                        , input
                            [ class "form-control"
                            , id "password"
                            , type_ "password"
                            ]
                            []
                        ]
                    , div [ class "text-center" ]
                        [ button
                            [ class "btn btn-lg btn-primary"
                            , type_ "submit"
                            ]
                            [ text "Create my account" ]
                        ]
                    ]
                ]
            ]
        ]
Bootstrap defines many CSS classes such as container, row, col-md-6, and form-group that have special meaning. We won’t try to understand what each of these classes mean in this book, but you can learn all about them from the official site. Once you know how Bootstrap works, it’s pretty easy to understand the code above.
The next step is to re-compile Signup.elm. Run the following command from the beginning-elm directory in terminal.
$ elm make src/Signup.elm --output signup.jsNow, if you open the signup.html file in a browser, you should see this form:

One big disadvantage of using an external CSS file or framework in this way is that we lose the ability to detect errors in our CSS code during compile time. The good news is, the Elm community members are working hard to provide Elm packages for making the use of external frameworks such as Bootstrap and Material Design more reliable through Elm’s type system and other features. The elm-bootstrap and elm-mdl packages give us the ability to design our pages with Bootstrap and Material Design respectively without sacrificing Elm’s type safety. You should definitely check them out.
For the rest of this section, we’ll use elm-css, so let’s revert Signup.elm back to the following code. This will allow us to keep using elm reactor instead of recompiling our code with elm make every time we make a small change.
Note: There is actually a tool called elm-live which reloads pages automatically whenever a change is made to them. We’ll cover it in the Using elm-live section in chapter 6.
module Signup exposing (main)

import Css exposing (..)
import Html.Styled exposing (..)
import Html.Styled.Attributes exposing (..)
import VirtualDom


type alias User =
    { name : String
    , email : String
    , password : String
    , loggedIn : Bool
    }


initialModel : User
initialModel =
    { name = ""
    , email = ""
    , password = ""
    , loggedIn = False
    }


view : User -> Html msg
view user =
    div []
        [ h1 [ css [ paddingLeft (cm 3) ] ] [ text "Sign up" ]
        , styledForm []
            [ div []
                [ text "Name"
                , styledInput [ id "name", type_ "text" ] []
                ]
            , div []
                [ text "Email"
                , styledInput [ id "email", type_ "email" ] []
                ]
            , div []
                [ text "Password"
                , styledInput [ id "password", type_ "password" ] []
                ]
            , div []
                [ styledButton [ type_ "submit" ]
                    [ text "Create my account" ]
                ]
            ]
        ]


styledForm : List (Attribute msg) -> List (Html msg) -> Html msg
styledForm =
    styled Html.Styled.form
        [ borderRadius (px 5)
        , backgroundColor (hex "#f2f2f2")
        , padding (px 20)
        , Css.width (px 300)
        ]


styledInput : List (Attribute msg) -> List (Html msg) -> Html msg
styledInput =
    styled Html.Styled.input
        [ display block
        , Css.width (px 260)
        , padding2 (px 12) (px 20)
        , margin2 (px 8) (px 0)
        , border (px 0)
        , borderRadius (px 4)
        ]


styledButton : List (Attribute msg) -> List (Html msg) -> Html msg
styledButton =
    styled Html.Styled.button
        [ Css.width (px 300)
        , backgroundColor (hex "#397cd5")
        , color (hex "#fff")
        , padding2 (px 14) (px 20)
        , marginTop (px 10)
        , border (px 0)
        , borderRadius (px 4)
        , fontSize (px 16)
        ]


main : VirtualDom.Node msg
main =
    toUnstyled <| view initialModel
Update
Now that we have presented the initial model to users, what can they do with it? They can enter their name, email, and password into the form and click Create my account to sign up. The first thing we need to figure out is how to store name, email, and password entered by the user in User model. The Html.Events module from the elm/html package defines a function called onInput that allows us to specify which message should be triggered when the user starts typing into an input text box. Here’s an example:
styledInput
    [ id "name"
    , type_ "text"
    , onInput SaveName
    ]
Note: The Html.Styled.Events module from the elm-css package also defines the onInput function. Just like Html.Styled and Html.Styled.Attributes, the Html.Styled.Events module is a drop-in replacement for Html.Events.
Don’t type the above code yet; we’ll need to add the onInput attribute to all of our input fields. We’ll do that after we’ve defined the SaveName and all other messages needed in our app.
Handling Messages
Add the following type definition right above main in Signup.elm.
type Msg
    = SaveName String
    | SaveEmail String
    | SavePassword String
| SignupSaveName, SaveEmail, and SavePassword messages will be triggered when the user enters name, email, and password respectively. The Signup message will be triggered when the Create my account button is clicked.
We need to tell Elm what to do with these messages. This is where the update function comes in. Whenever Elm receives a message, it checks to see if there is a pattern in the update function that matches the incoming message. If a pattern does exist, it executes the code for that pattern. Otherwise, the application crashes. Therefore, it’s important to handle all possible incoming messages. Add the update function above main in Signup.elm.
update : Msg -> User -> User
update message user =
    case message of
        SaveName name ->
            { user | name = name }

        SaveEmail email ->
            { user | email = email }

        SavePassword password ->
            { user | password = password }

        Signup ->
            { user | loggedIn = True }
The update function takes a message and a model (User in our case) and performs some operation on that model. It then returns the resulting model. So when users type their name in a text field, Elm receives the SaveName message. It finds a pattern that matches this message:
SaveName name ->
    { user | name = name }
All we are doing here is saving the name that came in as a payload with the SaveName message into the User model using the update record syntax. The code for handling messages originated from the SaveEmail and SavePassword text fields looks very similar. The branch for the Signup message simply sets the loggedIn flag to True. The actual code for handling this message requires us to know how to send HTTP requests to a server in Elm. We haven’t learned that yet, so we’ll have to wait until chapter 6 to fully implement it.
Creating Messages
We’ve created a mechanism for handling messages, but we still don’t have a way to create them. Let’s take care of that. Add onInput and onClick to styledInput and styledButton respectively so that they can fire messages to the runtime.
view : User -> Html Msg
view user =
    div []
        [ h1 [ css [ paddingLeft (cm 3) ] ] [ text "Sign up" ]
        , styledForm []
            [ div []
                [ text "Name"
                , styledInput
                    [ id "name"
                    , type_ "text"
                    , onInput SaveName
                    ]
                    []
                ]
            , div []
                [ text "Email"
                , styledInput
                    [ id "email"
                    , type_ "email"
                    , onInput SaveEmail
                    ]
                    []
                ]
            , div []
                [ text "Password"
                , styledInput
                    [ id "password"
                    , type_ "password"
                    , onInput SavePassword
                    ]
                    []
                ]
            , div []
                [ styledButton
                    [ type_ "submit"
                    , onClick Signup
                    ]
                    [ text "Create my account" ]
                ]
            ]
        ]
Previously, the HTML returned by view wasn’t creating any messages, so we just used msg as a placeholder in its type annotation.
view : Model -> Html msg
view model =
    ...
Now, view uses the onInput and onClick functions from the Html.Styled.Events module to generate messages of type Msg. That’s why we needed to change msg to Msg in view’s type annotation. Let’s import Html.Styled.Events in Signup.elm.
module Signup exposing (main)

import Html.Styled.Events exposing (onClick, onInput)
.
.
Wiring Everything Up
Here is how our main looks right now in Signup.elm:
main : VirtualDom.Node msg
main =
    toUnstyled <| view initialModel
Passing initialModel to view was enough when we were just displaying a static view. To allow interactivity, we need to add update in the mix. Modify main to this:
main : Program () User Msg
main =
    Browser.sandbox
        { init = initialModel
        , view = \model -> toUnstyled (view model)
        , update = update
        }
And import the Browser module in Signup.elm.
module Signup exposing (main)

import Browser
.
.
When we compare the main function in Signup.elm to the one in Counter.elm from the Model View Update - Part 1 section, we notice two differences.
Difference #1: The type annotation for main in Signup.elm includes User instead of Model. That’s because we decided to name our model User to make it more descriptive.
-- Signup.elm --

main : Program () User Msg
main =
    ...
-- Counter.elm --
main : Program () Model Msg
main =
...Difference #2: toUnstyled is applied before rendering the view in Signup.elm.
-- Signup.elm --

view = \model -> toUnstyled (view model)
-- Counter.elm --
view = viewAs mentioned earlier in the Rendering Styled Elements section, Elm doesn’t know how to render elements and attributes defined in the Html.Styled and Html.Styled.Attributes modules from the elm-css package. Therefore, we need to use the toUnstyled function to convert them to something Elm can render.
Using >> Operator
We assigned an anonymous function to the view field in Browser.sandbox. Anonymous functions are a little hard to read by nature. We can simplify main in Signup.elm by replacing the anonymous function with >> like this:
main : Program () User Msg
main =
    Browser.sandbox
        { init = initialModel
        , view = view >> toUnstyled
        , update = update
        }
>> is a built-in operator for composing multiple functions. You can think of func1 >> func2 as equivalent to this:
func1 >> func2 == \param -> func2 (fun1 param)We’re now ready to run our app once again. Refresh the page at http://localhost:8000/src/Signup.elm and you should see the sign-up form.
When the user enters all information and clicks Create my account, the resulting model will look like this:
{ name = "Art Vandelay"
, email = "art@vandelayindustries.com"
, password = "opposite"
, loggedIn = True
}
We don’t get any visual feedback when the Create my account button is clicked because we aren’t sending the user data to a server. We’ll learn how to do that in chapter 6.
Summary
In this section, we reinforced our understanding of how the Model View Update pattern works by building a slightly more complex app that allowed users to enter their name, email, and password.
The following diagram shows the interaction between various parts of the sign-up form app which is very similar to the interaction between different components in the counter app we built in Model View Update - Part 1.

We also learned how to style our views in different ways using inline CSS, the elm-css package, an external CSS file, and an external framework such as Bootstrap. Here is the entire code for building a sign-up form using elm-css:
module Signup exposing (main)

import Browser
import Css exposing (..)
import Html.Styled exposing (..)
import Html.Styled.Attributes exposing (..)
import Html.Styled.Events exposing (onClick, onInput)
import VirtualDom


type alias User =
    { name : String
    , email : String
    , password : String
    , loggedIn : Bool
    }


initialModel : User
initialModel =
    { name = ""
    , email = ""
    , password = ""
    , loggedIn = False
    }


view : User -> Html Msg
view user =
    div []
        [ h1 [ css [ paddingLeft (cm 3) ] ] [ text "Sign up" ]
        , styledForm []
            [ div []
                [ text "Name"
                , styledInput
                    [ id "name"
                    , type_ "text"
                    , onInput SaveName
                    ]
                    []
                ]
            , div []
                [ text "Email"
                , styledInput
                    [ id "email"
                    , type_ "email"
                    , onInput SaveEmail
                    ]
                    []
                ]
            , div []
                [ text "Password"
                , styledInput
                    [ id "password"
                    , type_ "password"
                    , onInput SavePassword
                    ]
                    []
                ]
            , div []
                [ styledButton
                    [ type_ "submit"
                    , onClick Signup
                    ]
                    [ text "Create my account" ]
                ]
            ]
        ]


styledForm : List (Attribute msg) -> List (Html msg) -> Html msg
styledForm =
    styled Html.Styled.form
        [ borderRadius (px 5)
        , backgroundColor (hex "#f2f2f2")
        , padding (px 20)
        , Css.width (px 300)
        ]


styledInput : List (Attribute msg) -> List (Html msg) -> Html msg
styledInput =
    styled Html.Styled.input
        [ display block
        , Css.width (px 260)
        , padding2 (px 12) (px 20)
        , margin2 (px 8) (px 0)
        , border (px 0)
        , borderRadius (px 4)
        ]


styledButton : List (Attribute msg) -> List (Html msg) -> Html msg
styledButton =
    styled Html.Styled.button
        [ Css.width (px 300)
        , backgroundColor (hex "#397cd5")
        , color (hex "#fff")
        , padding2 (px 14) (px 20)
        , marginTop (px 10)
        , border (px 0)
        , borderRadius (px 4)
        , fontSize (px 16)
        ]


type Msg
    = SaveName String
    | SaveEmail String
    | SavePassword String
    | Signup


update : Msg -> User -> User
update message user =
    case message of
        SaveName name ->
            { user | name = name }

        SaveEmail email ->
            { user | email = email }

        SavePassword password ->
            { user | password = password }

        Signup ->
            { user | loggedIn = True }


main : Program () User Msg
main =
    Browser.sandbox
        { init = initialModel
        , view = view >> toUnstyled
        , update = update
        }